

This has been the summer of backyard projects, including a new fence and our back porch refresh. I’ve finally got a progress update for you today, and I’ll share the last step we’re still debating. I call this project a refresh, not a remodel. That’s because I haven’t actually changed much, although we’ve updated almost every surface. Since there’s new fence along the east side of the yard, I took some photos to share our progress.
This post contains affiliate links. Read my full disclosure here. Thanks!
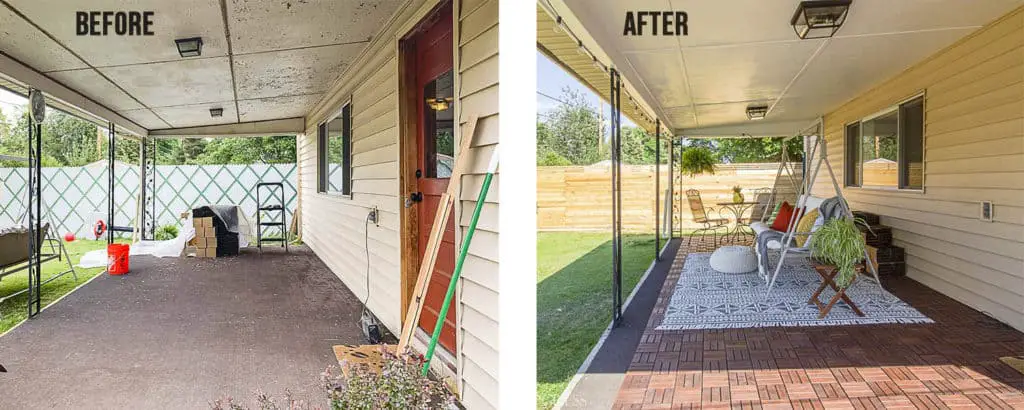
Back Porch Refresh Overview
Here’s the original “before” shot of the back porch, which is exactly what it looked like when we bought this house. You also get a nice shot of our old fence, in all its green-and-white, chain-linked glory.
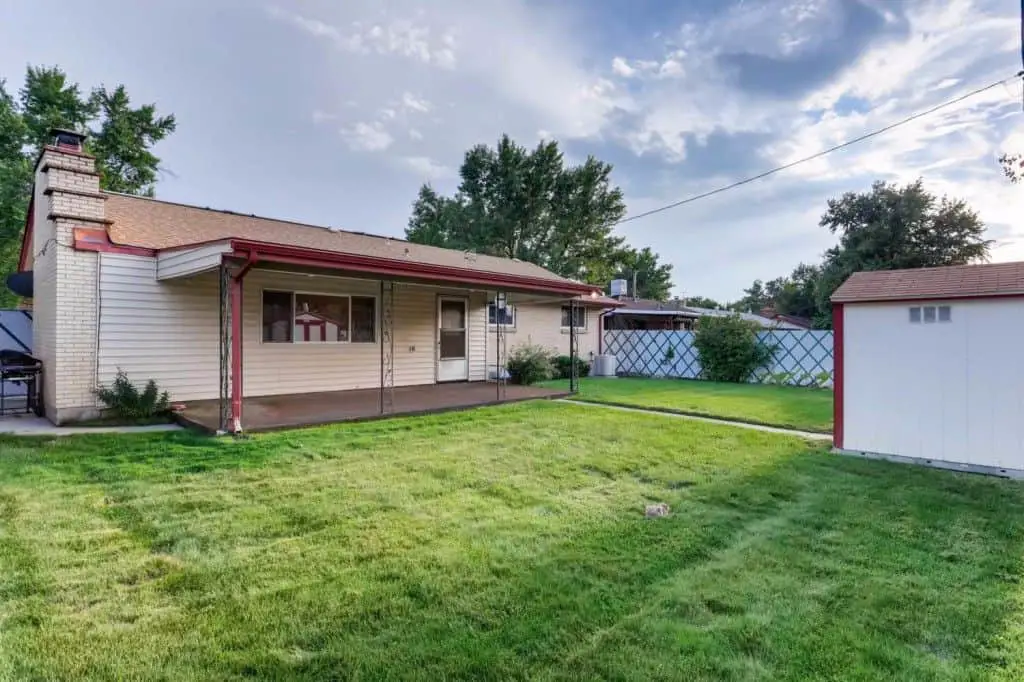
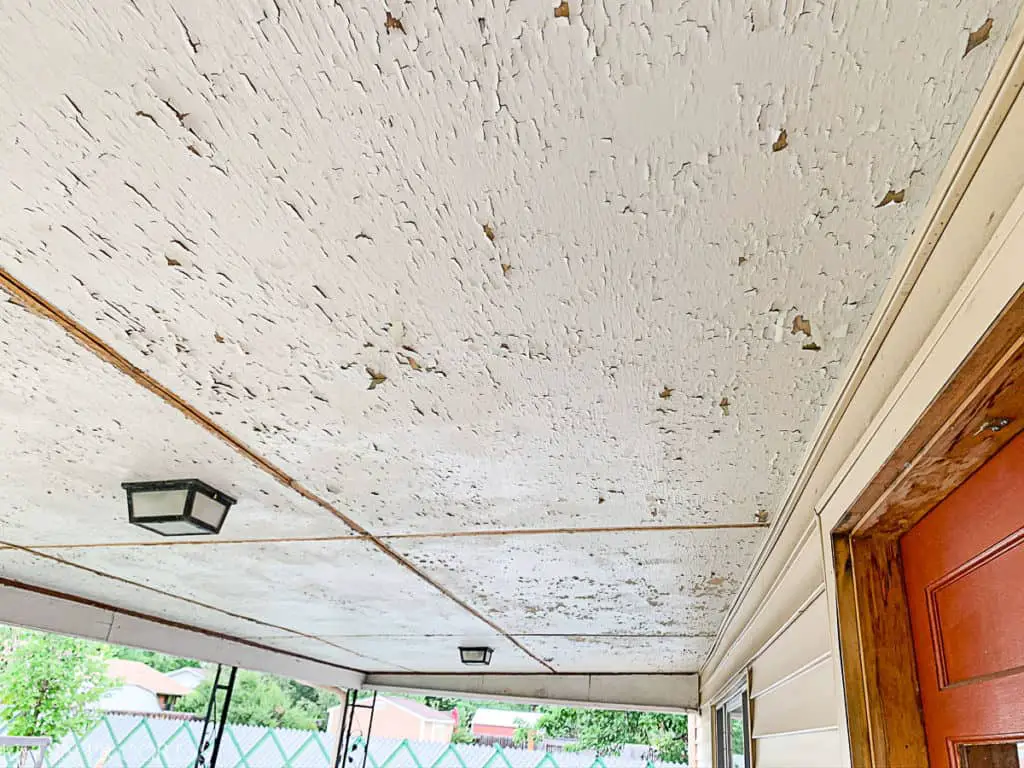
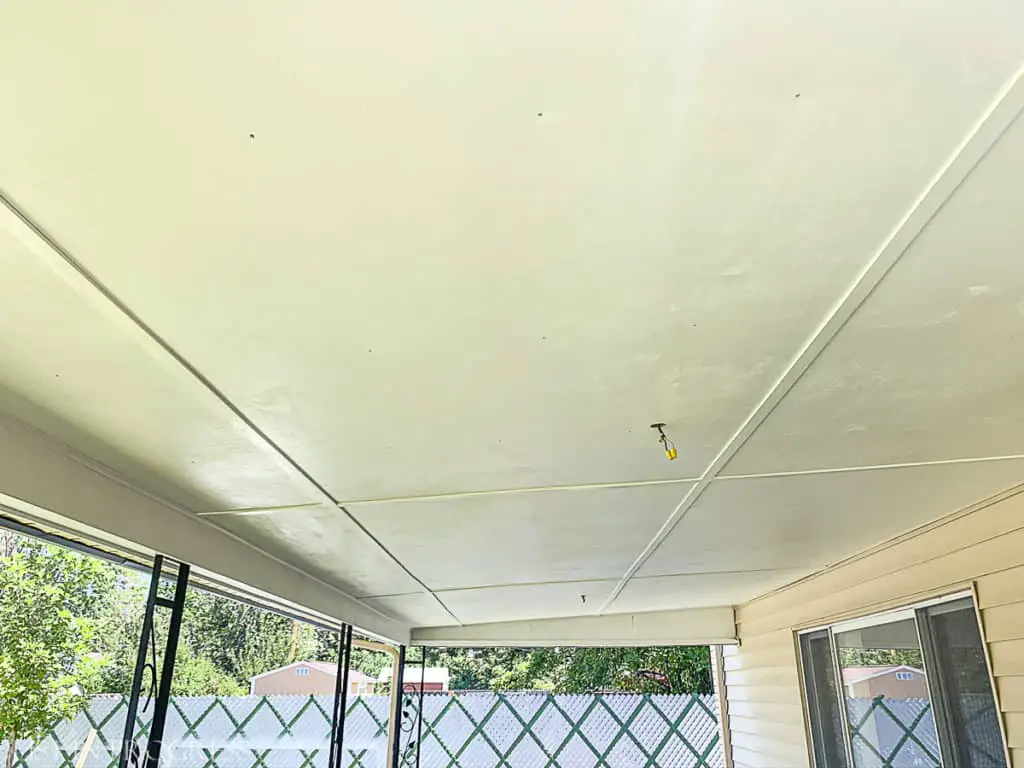
And here is a more recent before photo, with the same peeling paint and nasty outdoor carpet. This shot was taken in June, when I was still busy researching light fixtures and scraping the ceiling. We’ve already tackled some of the bigger exterior projects, like a new roof, dark trim, and beige downspouts. I’ve been gradually phasing out all the red trim and accents on the house, and I plan to repaint the back door soon.
Check out > 15 Ourdoor Ceiling Lights to Spruce Up Your Space | Our Hip New Roof
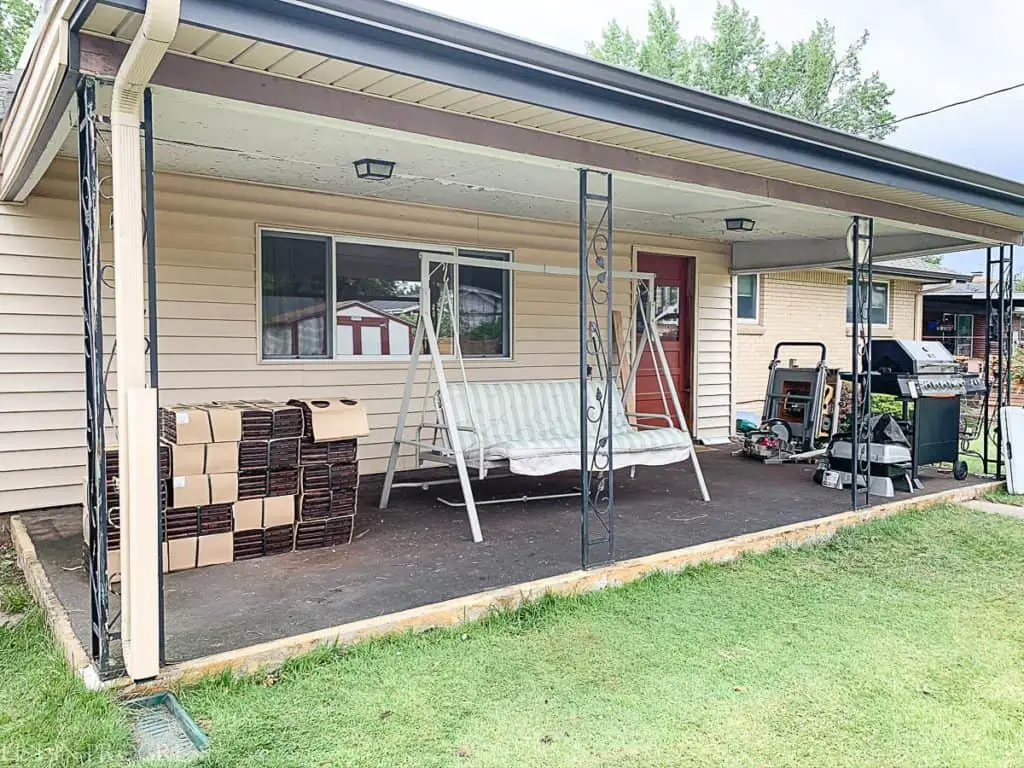
Since then, I’ve worked on some thrilling projects, including:
– cutting outdoor carpet off the sides of the concrete slab
– scraping carpet glue off concrete
– cleaning the ceiling and trim
– scraping peeling paint chips from the ceiling and trim
– repainting the ceiling and side panels
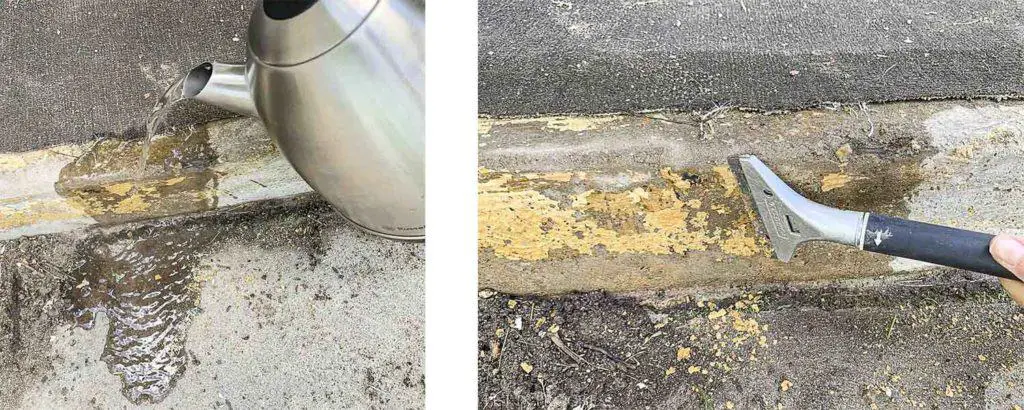
Since you asked, scraping carpet glue from concrete is exactly as fun as it sounds. If I wanted it to look great, I would rent a grinder, but this is good enough for me. I poured hot water on the glue and then used this tool to scrape off as much as I could.
Our Painting Shortcut
While painting acres of plywood is not exactly a shortcut, our strategy to fix the ceiling was easier than scraping and repainting the original wood. As you can see, the peeling paint was epic. That’s what happens if you don’t use a good primer. Yikes! From the moment we toured this house, our plan has always been to install new plywood directly on top of the old ceiling. That turned out to be the right choice. Back porch refresh strategy = work smarter, not harder.
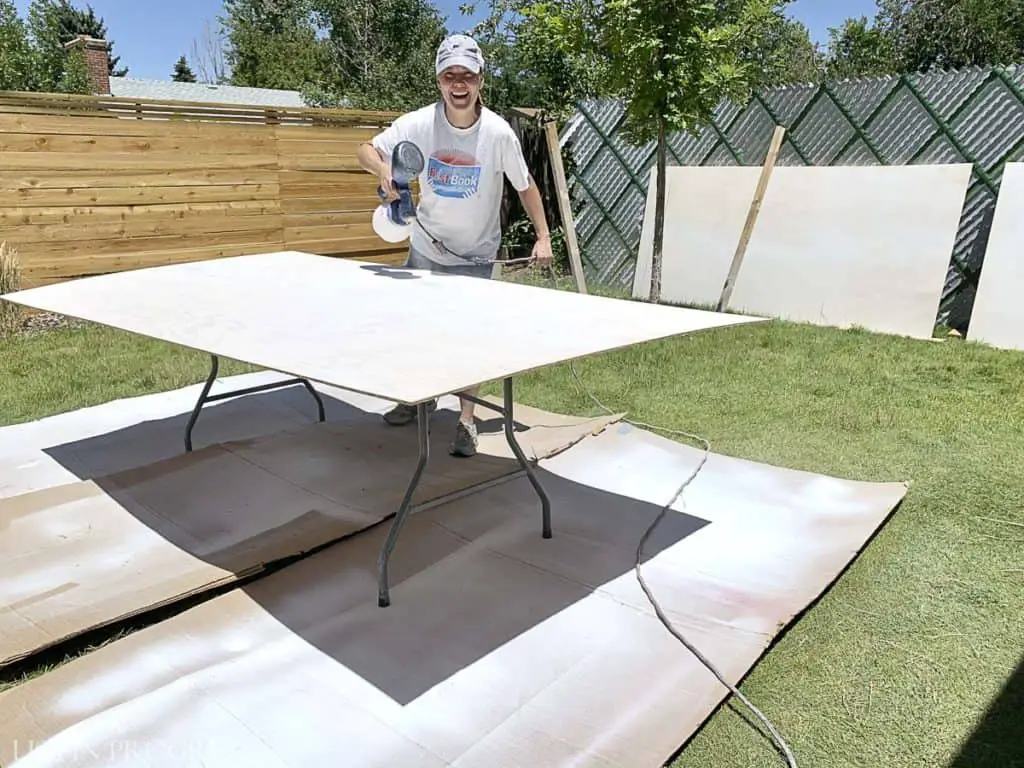
We pulled off the old 1/4″ x 2″ lathing strips that covered the plywood seams, and I scraped the ceiling, just to remove the loose chips. Then I sprayed the new 1/4 inch plywood sheets with this primer and two coats of Behr exterior paint in Ultra Pure White. Sometimes 1/4″ plywood is also called lauan (LOO-AHN), which is normally used for underlayment beneath flooring. It was perfect for our ceiling project because it’s a thinner and lighter plywood.
I also primed and painted the new trim pieces and new lathing strips on the ground, before they were installed, because that’s sure easier than painting the ceiling. FYI, I say “lathing” because that’s the term I’m used to, but we bought something called “lattice” from a local trim store. I just called around until I found a shop that would sell us wood strips roughly 1/4″ thick x 2″ wide.
> 12 Tips for Using a HomeRight Paint Sprayer
In between stages of that project, I repainted the side panels and front beam under the roof. All of this took the better part of 2 gallons of paint.
Installing the New Ceiling Panels
Once the plywood painting was done, Wyatt attached the new ceiling panels, right over the existing plywood. He used 1 1/2″ exterior screws along the edges, because those were later covered with painted lathing strips.
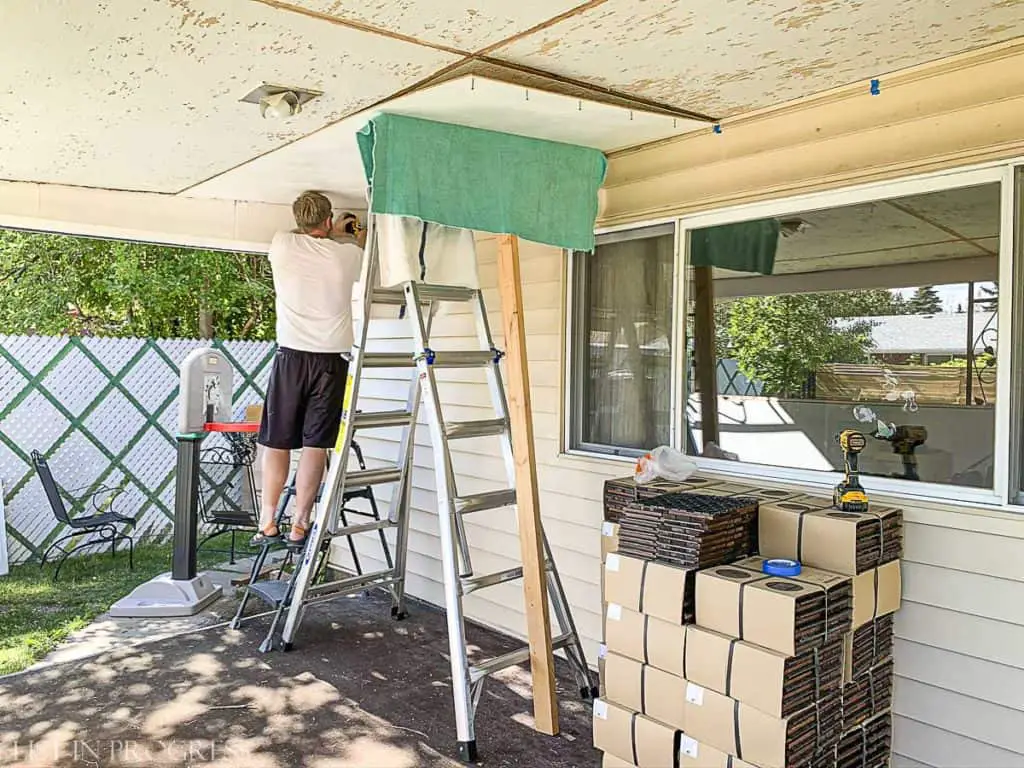
For the center of the panels, Wyatt used these screws, since they are white and somewhat unobtrustive. Here’s a close up. I do not plan to paint over them.
Around the inside perimeter, we installed new pine cove moulding, exactly as it was before. After some touch ups, here’s the ceiling, looking fresh and new!
An Easy Outdoor IKEA Floor System
***Update 12/20 – CAUTION – These tiles do NOT hold up to snow. See the section farther down in this post called Winter 2020 Update for details. In July 2022, I found a matching stain at Lowe’s. It’s cheap and easy. Here is the stain you need to fix IKEA outdoor furniture and Runnen deck tiles!!***
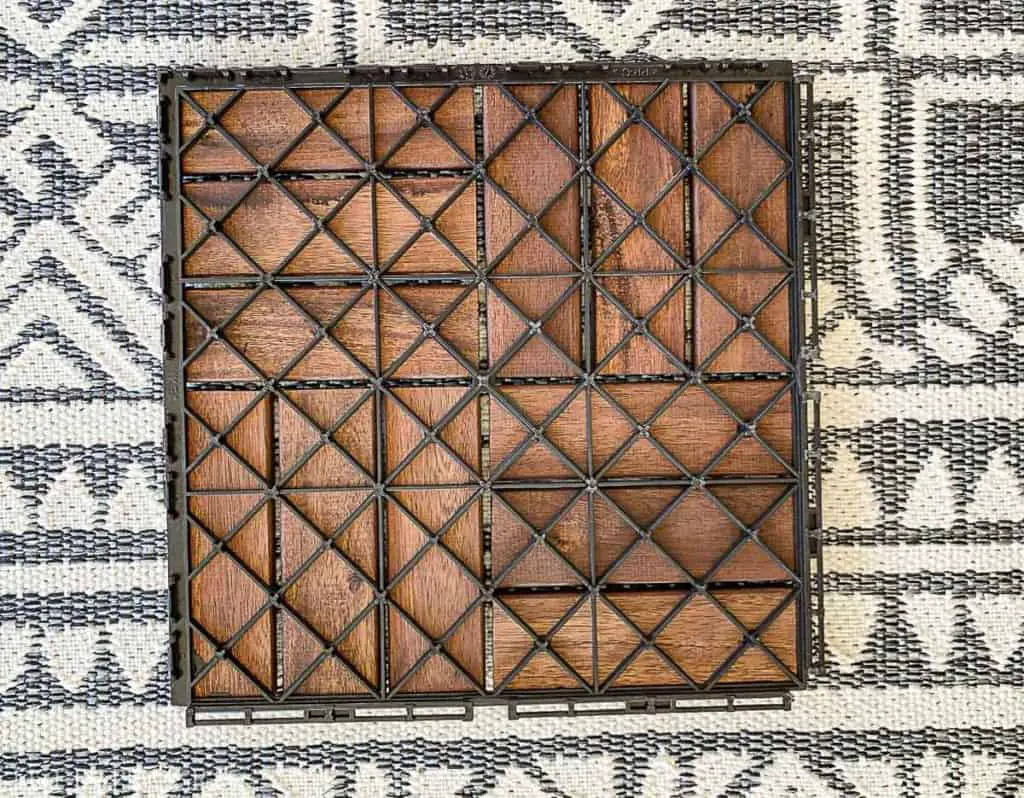
For me, the best part of this back porch refresh was laying my new IKEA floor tiles. I’ve had my eye on this outdoor wood floor system since last year, and Wyatt was an easy sell, since it just clicks together. We decided to overlay the ratty carpet for a few reasons. One, it’s dry here in CO and we’re not worried about mold. Two, the carpet is dark and would blend in with the black plastic grid under the tiles. Three, it’s easier to clean and cover it up, than to remove carpet glued to concrete. (See “scraping glue off concrete is fun!” above for details. Ha!)
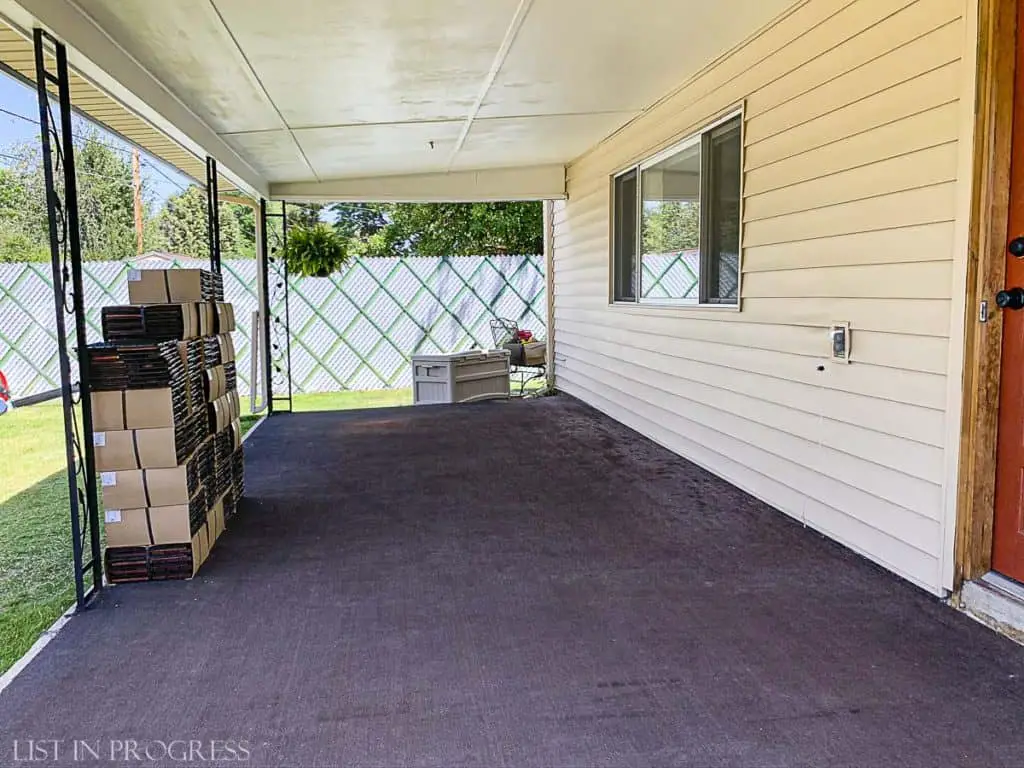
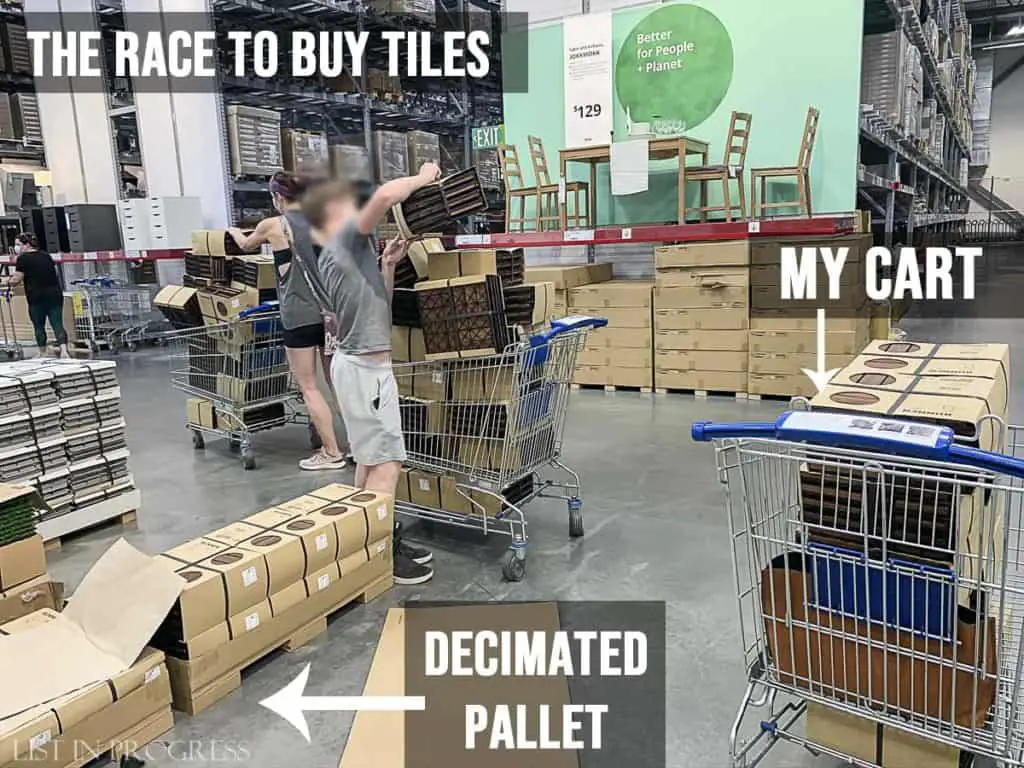
The flooring system is sold in bundles of 9 tiles; each tile is one square foot, so the entire bundle covers 9 sq ft. To figure out our square footage, I measured the porch and then divided the total sq ft by 9. Our porch is 240 square feet, which is just under 27 bundles. I ordered 29 to account for 10% extra, just in case there were flaws or other problems. More on that later.
How to Install IKEA Floor Tiles
First, I cleaned the carpet as best I could. I swept off the dust and dirt and then vacuumed. Amazingly, my old Bissell was up to the task and is still running! #hoss Next, I lined up the the first row of tiles against the house and centered them on the porch.
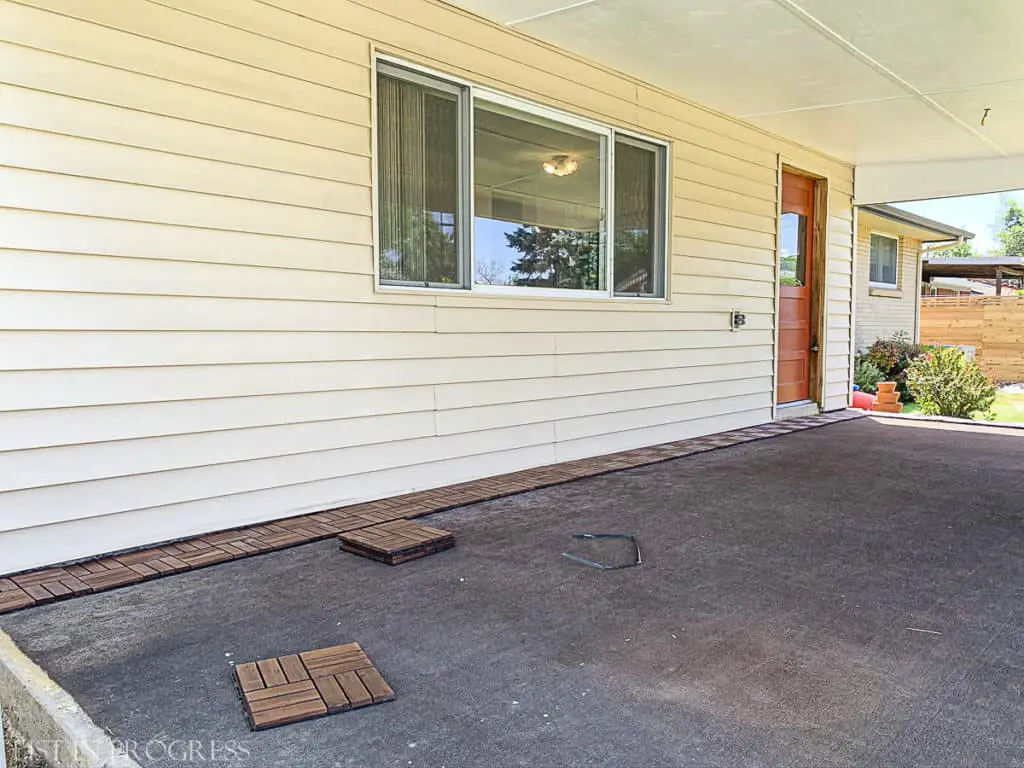
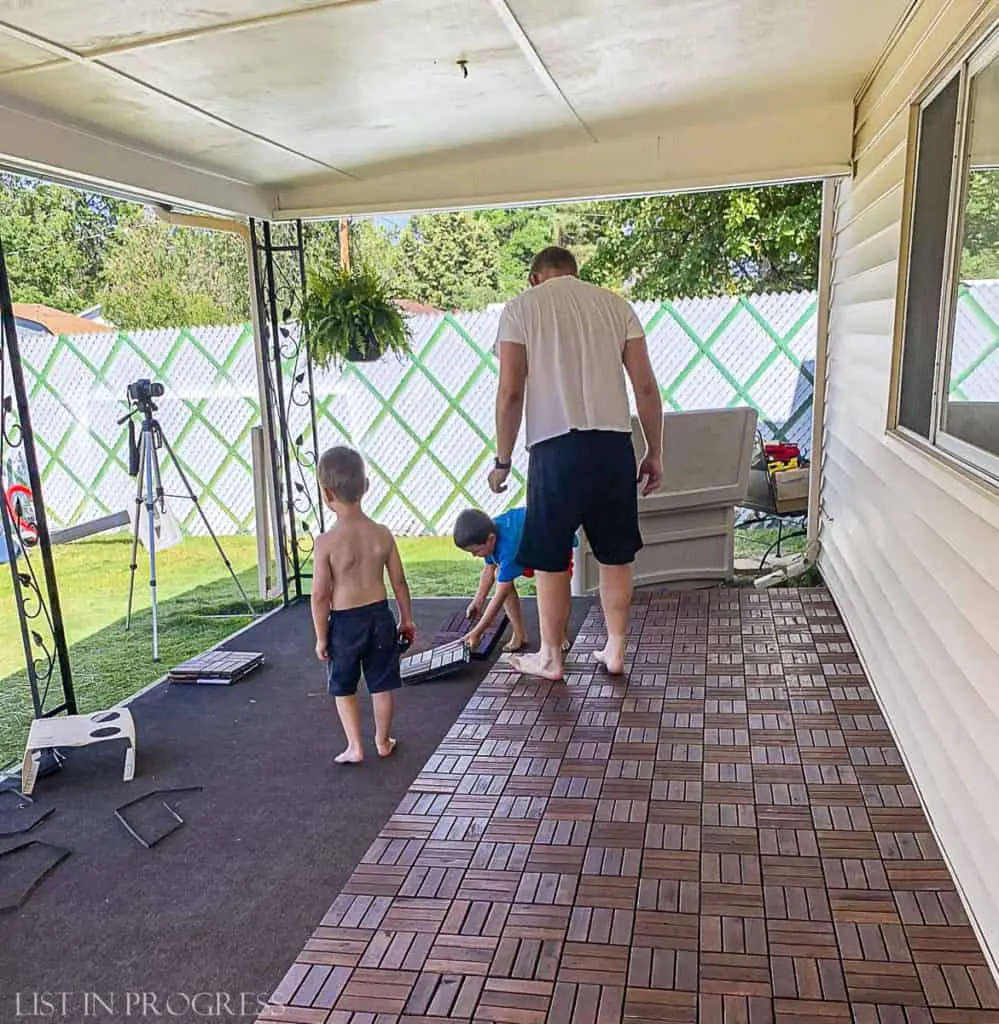
To install the tiles, overlap the tiles and click them together at the connecting seams. It takes some force, and we realized it’s easier to stand on the seams than to kneel down and push with our hands.
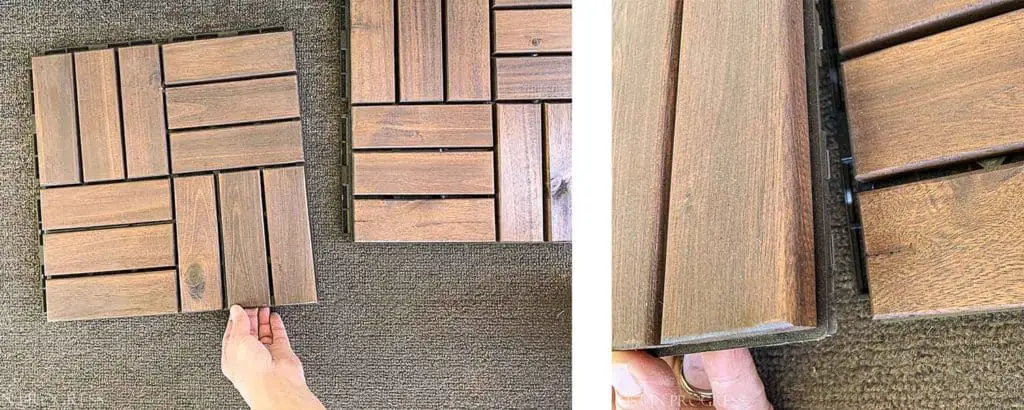
The kids helped us with this installation project. After I laid the first course and centered it, we worked together to install the rest. My older son set up the tiles and Wyatt and I clicked them together. The four-year-old supervised. As one does.
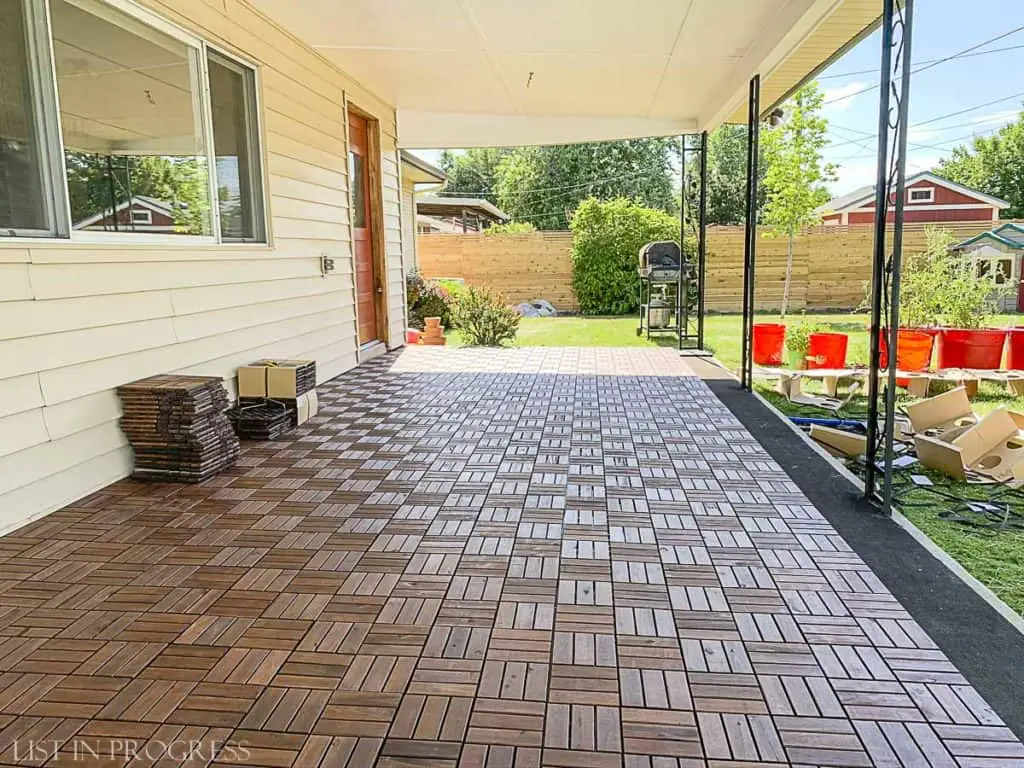
Now that we’re 90% finished, I LOVE the look of this floor. Seriously, I’m so thrilled with it! We left off the last course for a reason, which I’ll explain below.
Word to the wise: buy at least 15% extra, because there are occasional squares with flaws. I started with 10% extra, but we are picky and I should have just ordered more to begin with. Plus, they are popular and go out of stock quickly. I hit IKEA on a Saturday at opening to buy a few more bundles, and I just barely grabbed mine while this lady and her son hustled to load up the rest. (Couldn’t resist snapping the photo below.) You can easily make returns at Ikea for up to a year, so trust me and buy extra.
***Winter 2020 Update: Tile DISASTER***
Word to wise – DO NOT INSTALL this floor system if you get snow in the winter. The flooring held up just fine in the rain, but as soon as we started to get a few inches of snow this fall, the stain just disintegrated. I’m so disappointed! Here’s what it looks like as of December 2020:
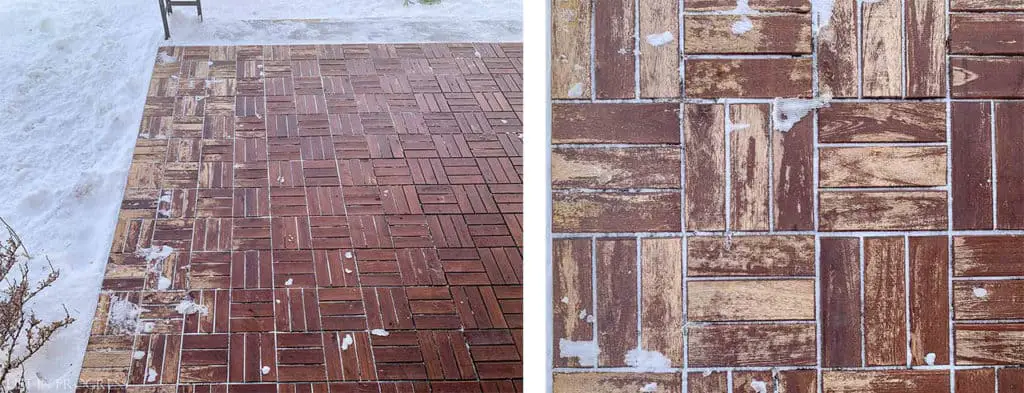
I pulled up the ruined tiles along the outside edges and I’m planning to pull up the rest of the floor during our next nice stretch of weather. I want to store the good tiles in the garage over the winter and then try again in the spring.
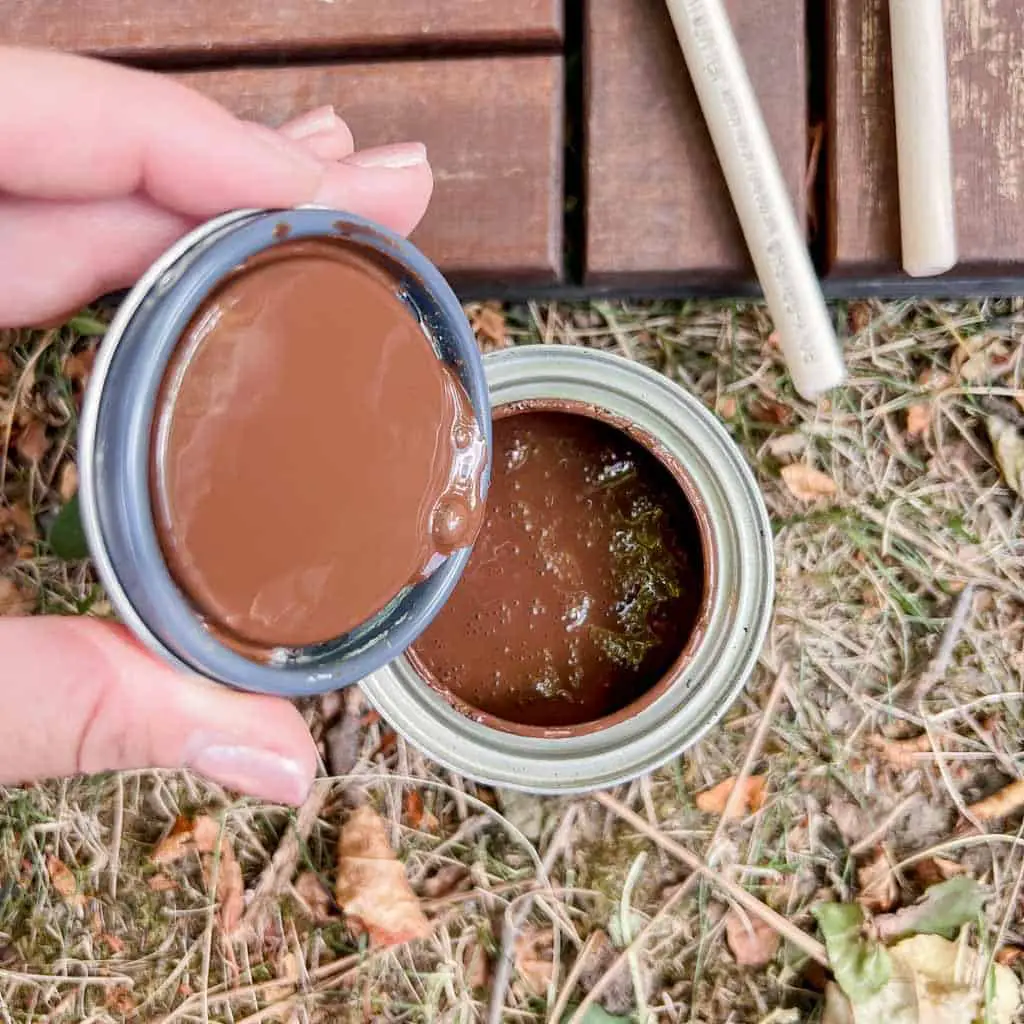
UPDATE July 2022
I restained the Runnen tiles and they look great – again – for now…
Here’s the matching stain I bought at Lowe’s. Read this post for details.
What’s Left? Help Us Decide…
Here’s the part that’s still up for debate in this back porch refresh. (Well, along with the floor…) Even though I spray painted the iron metal supports – and they look much better – they are quite decorative and dated. I would love to replace them with wooden 4×4 posts. Wyatt is on board, but this is such a low priority project on our list, I’m just not sure we’ll get to it. That’s why the last course of flooring is missing. If we DO replace the posts, it makes sense to leave space for that, and cut the tiles to fit afterward. I don’t want to waste tiles by cutting them now.
What is your vote? Move on with life and ignore the black iron posts? Or prioritize replacing them with wooden 4×4 posts for an updated look?
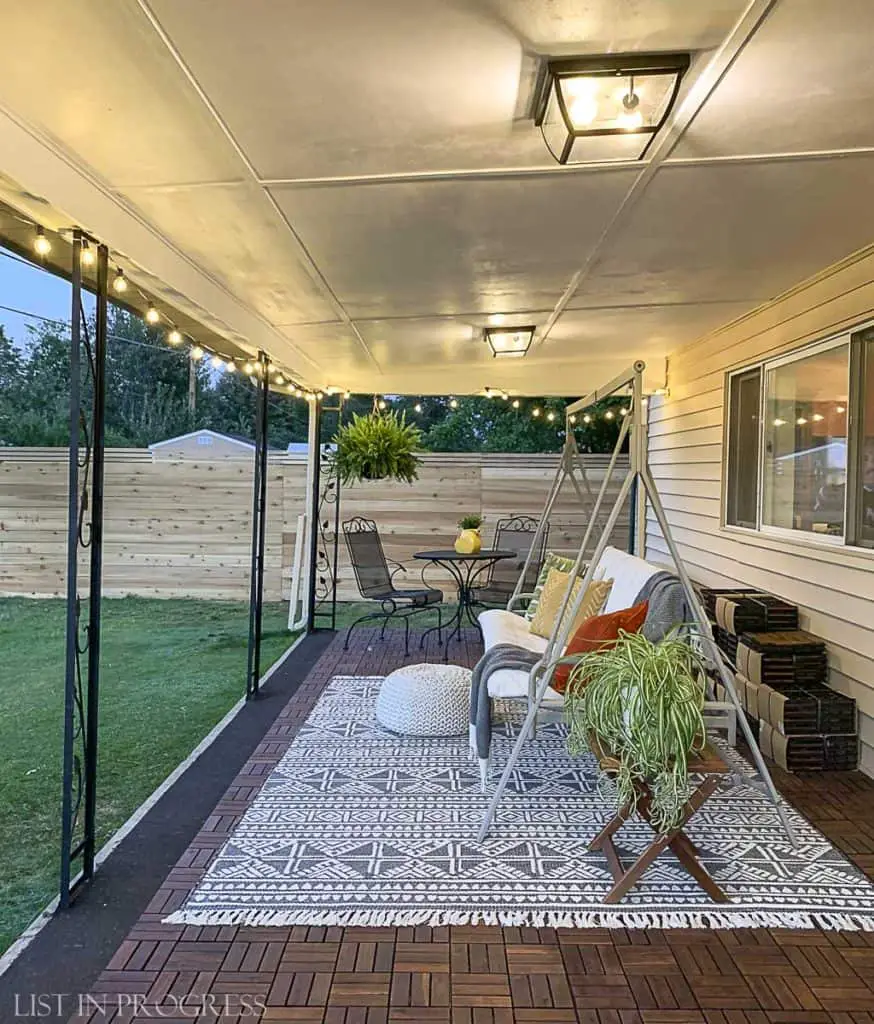
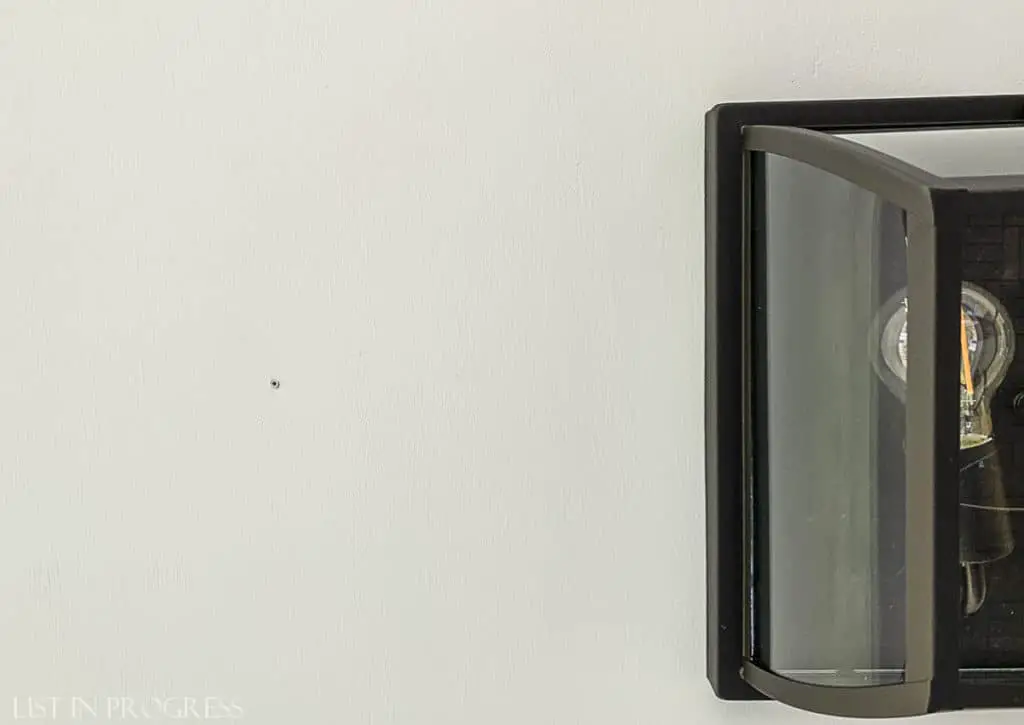
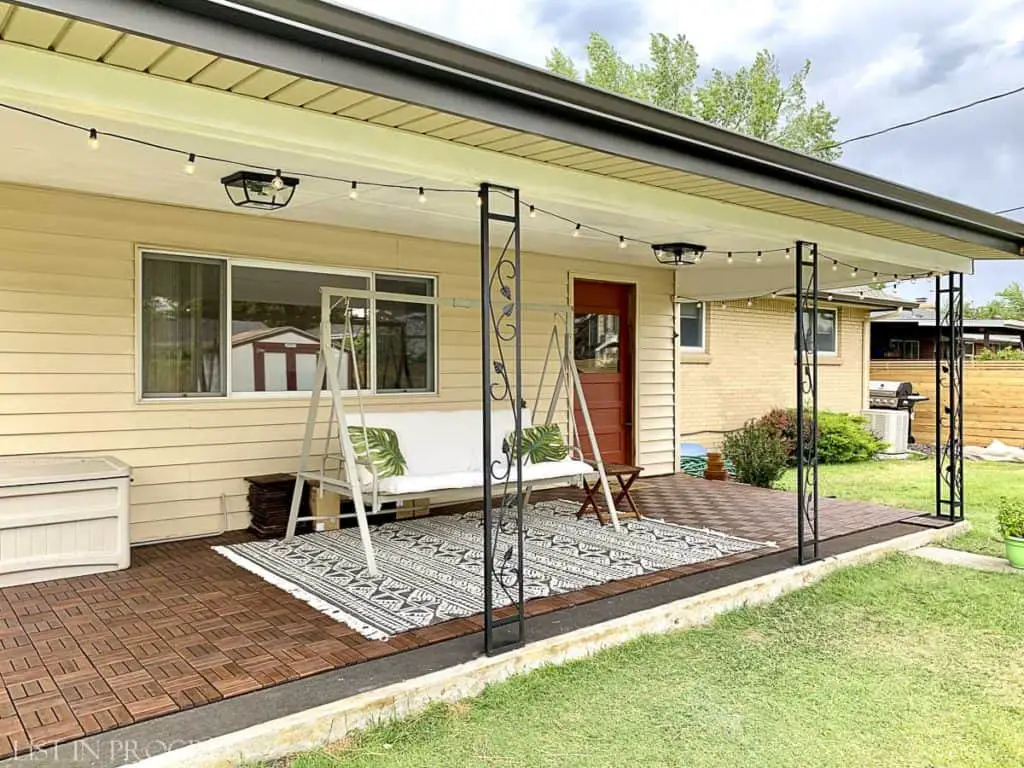
In either case, I chose these flushmounts to replace the old porch lights and they look fantastic with Edison bulbs. I think the lights will coordinate with either new wooden posts or the old iron supports. I also hung globe string lights to add some ambiance, and the touch of black helps tie everything together. Check out the porch at night!
Check out > 15 Ourdoor Ceiling Lights to Spruce Up Your Space
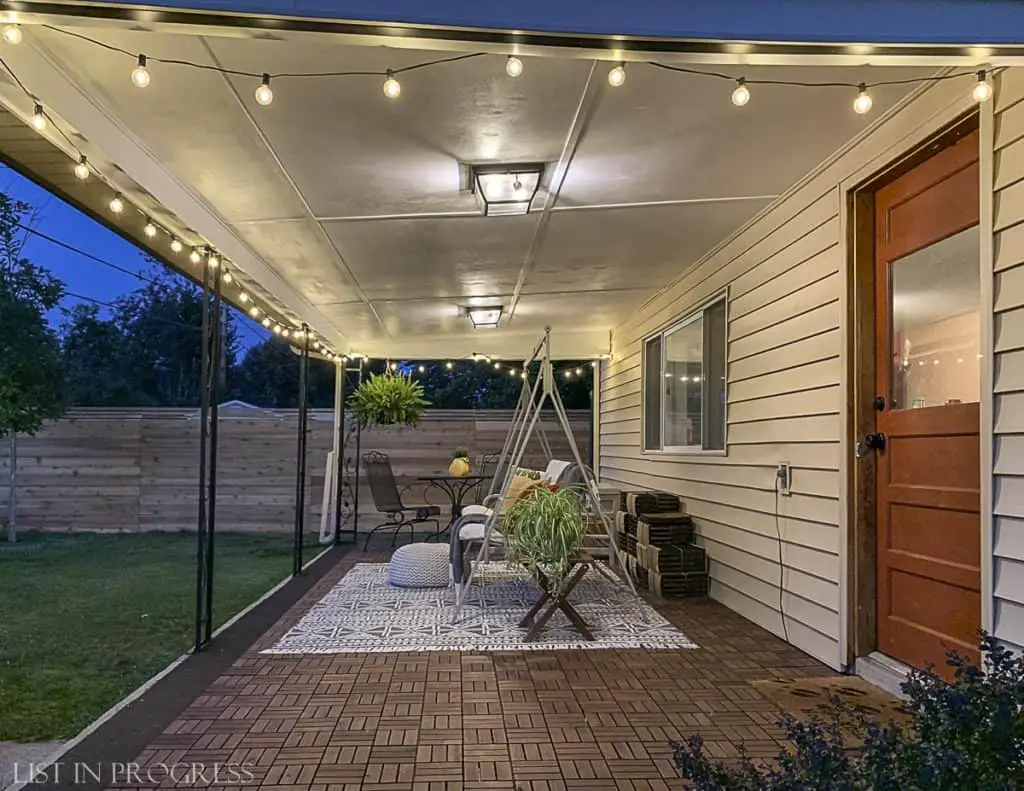
Ooo… Ahhhh… Before and After
I know, I know, I just admitted that we’re only 90% done. But let’s review how far this back porch refresh project has come:
This is me, every day since… if I can’t be at the beach this summer, I’ll take a porch swing and a glass of iced tea.

SOURCE LIST – Back Porch Refresh
So that’s the scoop on our backyard! I’ll share photos whenever we commit to a porch plan and finish up that floor. In the meantime, here is the overall source list for this back porch refresh.
CEILING SUPPLIES
1/4″ x 4 x 8 plywood/lauan
Pine cove moulding
1/4″ x 2″ (approx) lathing strips (call a local trim or millwork shop)
White trim screws
Exterior 1 1/2″ deck screws
PAINTING SUPPLIES
Primer – Kilz 2 All Purpose
Ceiling Paint – Behr Premium Plus Exterior in Satin, Ultra Pure White
Paint for iron supports – Rustoleum Stops Rust Spray Paint, Flat Black
Favorite paint brush – Wooster Shortcut 2″
Favorite paint sprayer – HomeRight Super Finish Max
FLOORING
Glue scraping tool – Husky Wallpaper Stripper
IKEA Runnen floor tiles – we used at least 15% extra
LIGHTING
Ceiling flushmount lights
Edison LED bulbs
Globe bulb string lights
DECOR
Porch swing – ours is ancient, but here is a similar swing
Yellow pillow
Throw blanket/towel
Poof (not outdoor)
Side table
Outdoor rug – ours out of stock, but here is a similar Target rug
More DIY Projects from List in Progress

1 – Easy DIY Hanging Rope Shelves Tutorial
2 – How to Create a Basket Wall with Command Hooks
3 – 2 Affordable Laminate Countertop Update Ideas
4 – 12 Mason Jar Crafts to DIY This Summer
Subscribe and never miss a post!
I will only email you 2-3 times per week, MAX. No junk!
[mc4wp_form id=”402″]


I have those tiles and when a few started looking less than new I painted them with fusion mineral paint and they look great.
Hi Shelby, Thanks for the idea! I will try it.
Your backyard looks amazing! What colour is the back door?
Thank you, Edel! Unfortunately, I have no idea what the door color is. It was painted long before we bought the house.
I vote to forget the posts/remaining flooring for now. If everything else you want done gets done and you’re itching to do something, then revive the porch project. It looks Quite fabulous to me right now.
Your vote is my vote for now! Thanks! 😉