

Love Craftsman-style door trim? Here’s a full tutorial on our custom-built DIY Craftsman-style door trim! I’ve included exact dimensions and products that we used, as prompted by readers who asked for more detail.
It took us a while to update the casing through the entire house, but it’s totally worth the wait for a more high-end look. This Craftsman-style trim is one of my favorite details in our last house, a 1965 ranch-style home. Here’s how we made it.
Don’t Miss the Big Reveal – Tour Our Remodeled Home
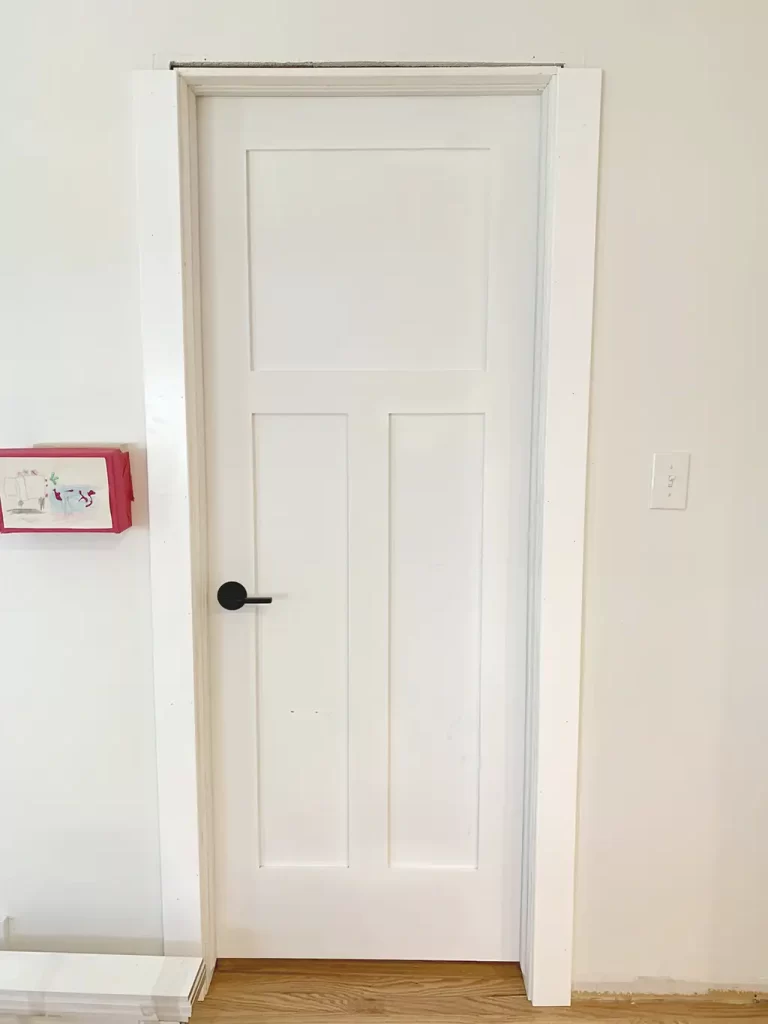
Old Doors Before Craftsman-Style Door Trim Update
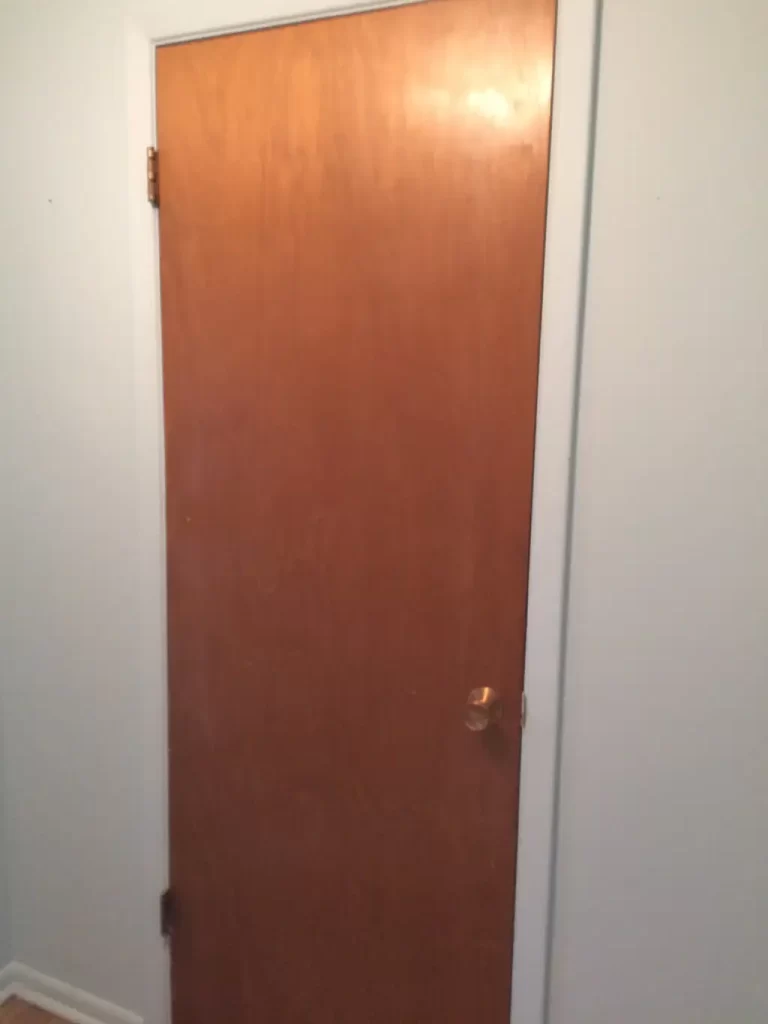
Here’s where we started, with original hollow doors and simple molding. Not a great photo, but you can get the idea.
We actually swapped out a bunch of these doors for damaged ones at our first house. (We owned both houses for a time, while we finished work on the first and moved into the second.)
I painted the old doors white, to match the trim and unify the interior, and they looked pretty nice.
Painting is almost always the most affordable update, but since we needed to replace some anyway, we invested in upgraded doors for the new house (similar). I’m so happy we did. They make such a difference in the look and feel of this home.
Want to See The Final Product?
Don’t Miss the Big Reveal – Tour Our Fully Remodeled Home

Craftsman-Style Door Trim to Match + Our Measurements
**All product sources are listed at the end of the post.**
When we first moved in, I sorted through Pinterest to get ideas for door trim, or casing. There are some great ideas out there!
What appeals to me the most is a stacked look on top using a few pieces of molding. We have enough room above the rough openings to add interesting trim without crowding the space.
Read More: 60+ Modern Black Door Hardware Ideas
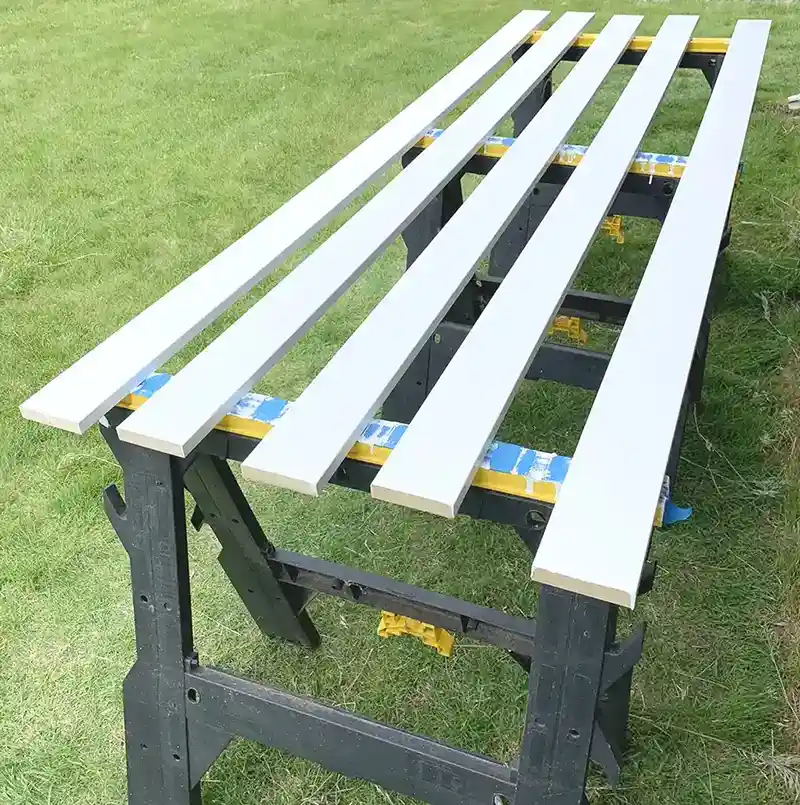
Our first step was to head to Home Depot and buy a few pieces of trim in different sizes. Next, we held them up in different combinations above the doors to figure out what looks best.
Since we have 1×4 running vertically along the sides of the doors, we worked around that. After looking at the trim in different combinations, we chose some smaller pieces to add detail. We both like a header with boards like this, but all painted white:
Read More: How to Paint Ceilings Easily and Quickly
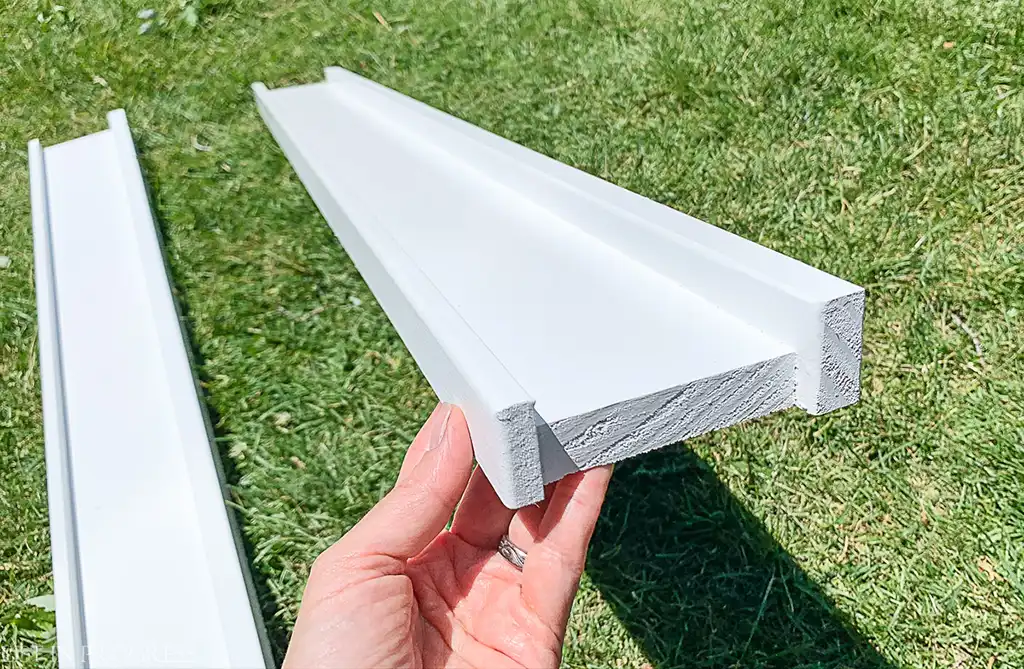
Now, here’s the thing. The dimensions are all flexible. We started with 1×4 boards for the sides and top.
The dimensions of the smaller pieces matter less, because it’s all about how they work together. I’ve posted a photo below with exact sizes we’re using, but honestly, it doesn’t matter if you get similar ratios of larger to smaller pieces.
I wanted a wider piece on the very top, so it would cover the 1×4, and a smaller “skinny” piece under the horizontal 1×4.
I’ve seen quarter-round used as the smaller accent, attached to the bottom of the horizontal 1×4, or a slim board with a rounded edge.
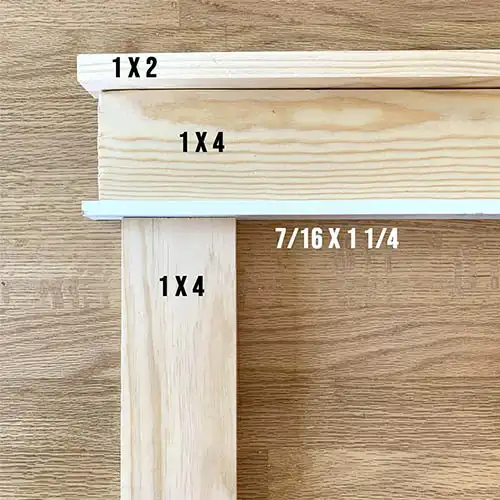
For our project, the widest pieces on top overhang the vertical door casing by 1 inch on each side. The 1×4 on top is just 1/4″ shorter on each side than the longer pieces.
For example, one door measures 31.5″ wide from side to side on the outside of the door casing. The widest header pieces are 33.5″ and the 1×4 sandwiched between them on top is 33″.
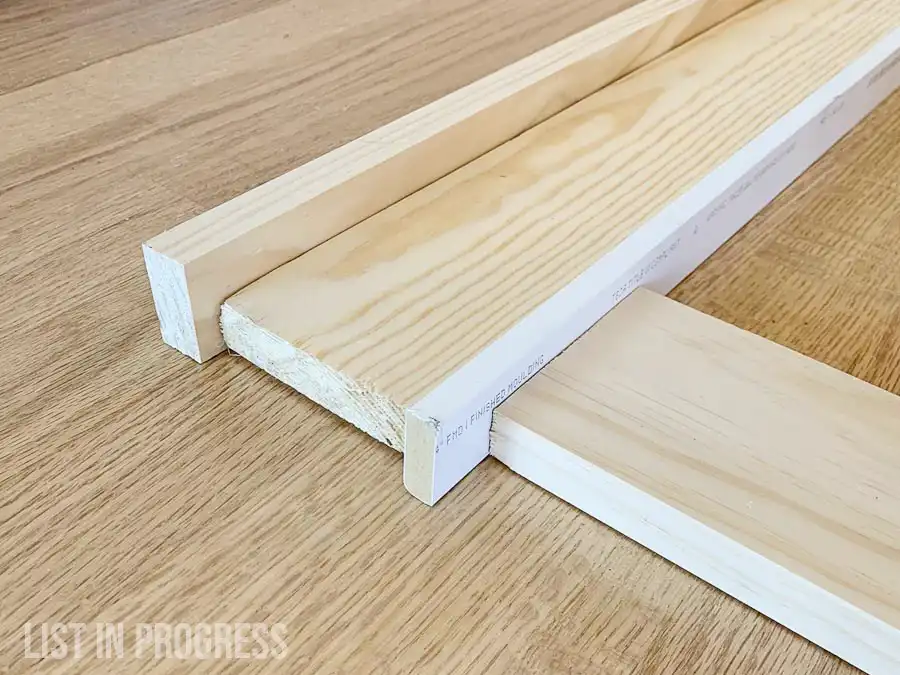
Here’s a side view of the trim pieces together.

Read More About Our DIY Home Updates
Favorite Behr White Paint Colors
Closet Door Ideas to Update Any Room
The Best Flooring for Every Room in Your Home
Trends in Cabinet Hardware
Which is Better? Wood or MDF?
One other consideration is the type of material for door trim. Through most of the house, we use MDF boards, because they are less expensive.
We will use real wood for the trim in the bathroom, but otherwise, I can’t even tell much of a difference once it’s all painted. For the sake of efficiency, I painted stacks of MDF 1×4 before installation.
Pro tip: paint trim before it’s installed. We just do touch-ups afterward! It’s much easier this way.
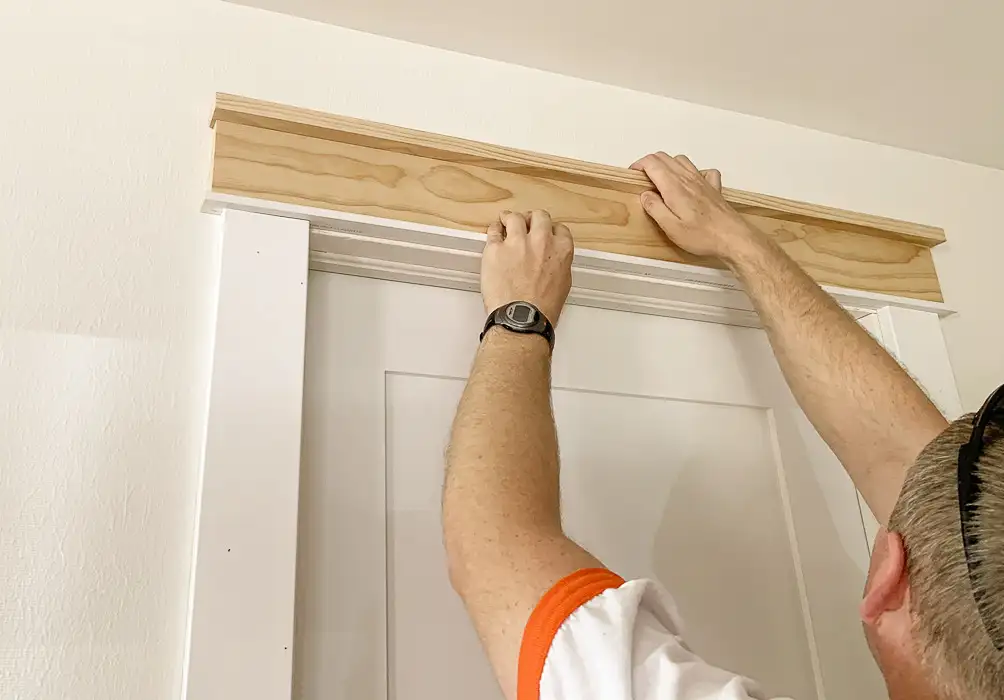
Once it was all painted (Ultra Pure White semi-gloss by Behr), Wyatt assembled the pieces for the tops of the doors and nailed them together. It’s much easier to do that first and then attach the whole thing to the wall.
Here are some of the headers that I painted outside before installation:
Our Favorite Behr White Paint Colors
Here’s what the casing looks like before that piece is attached:
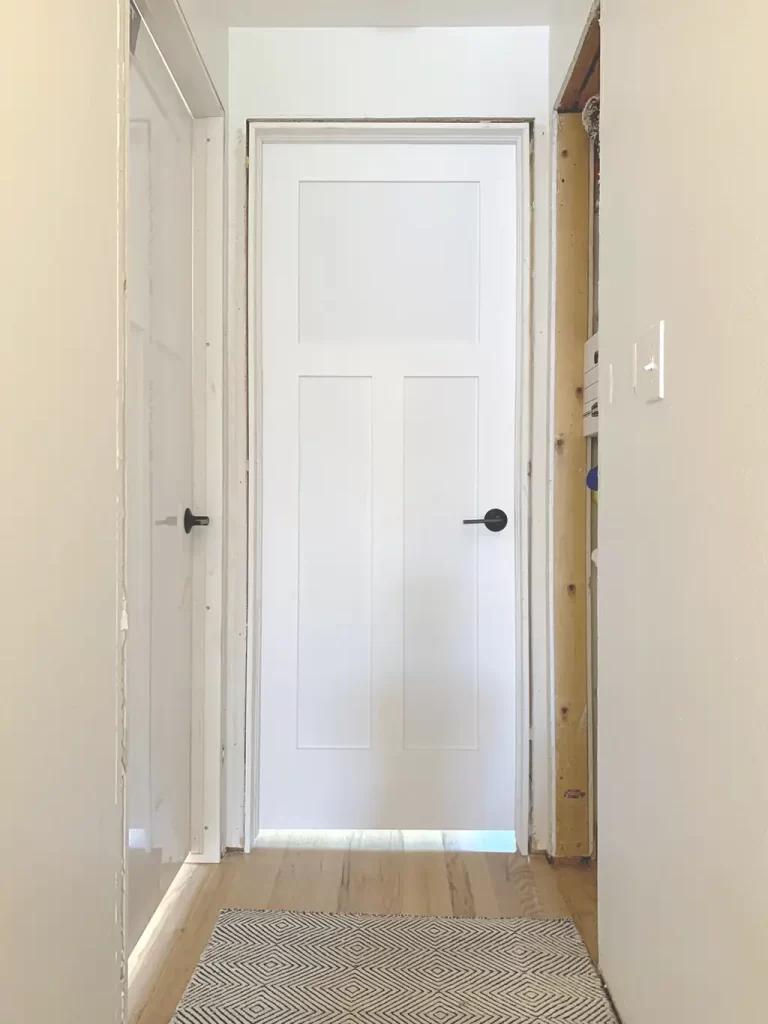
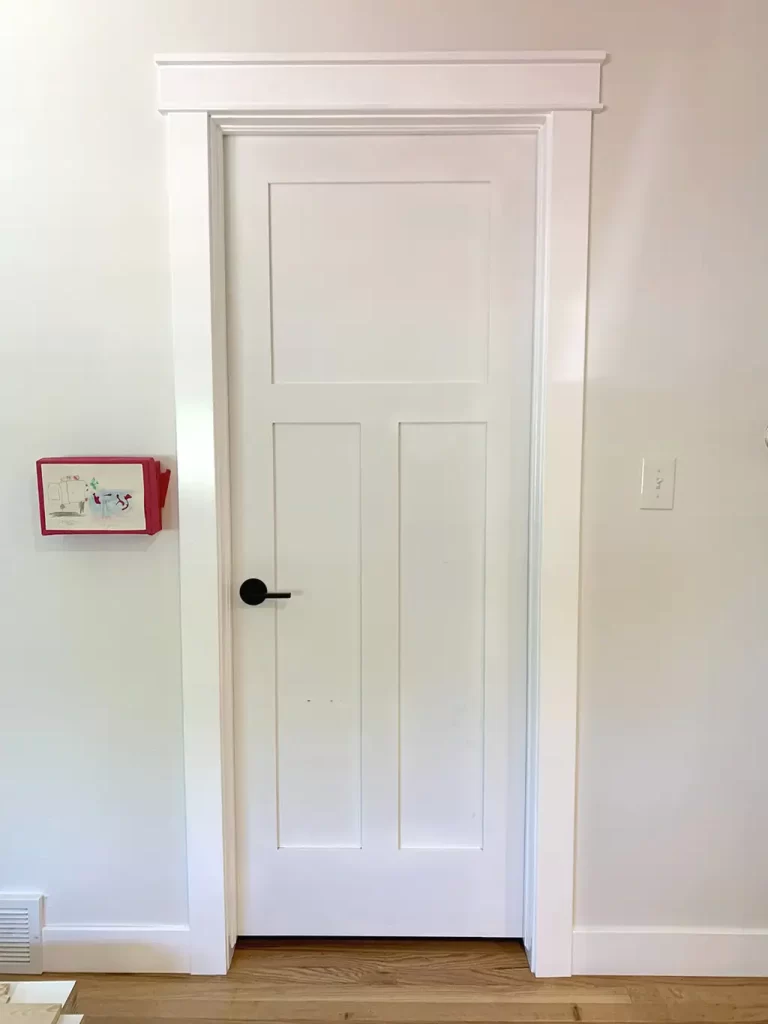
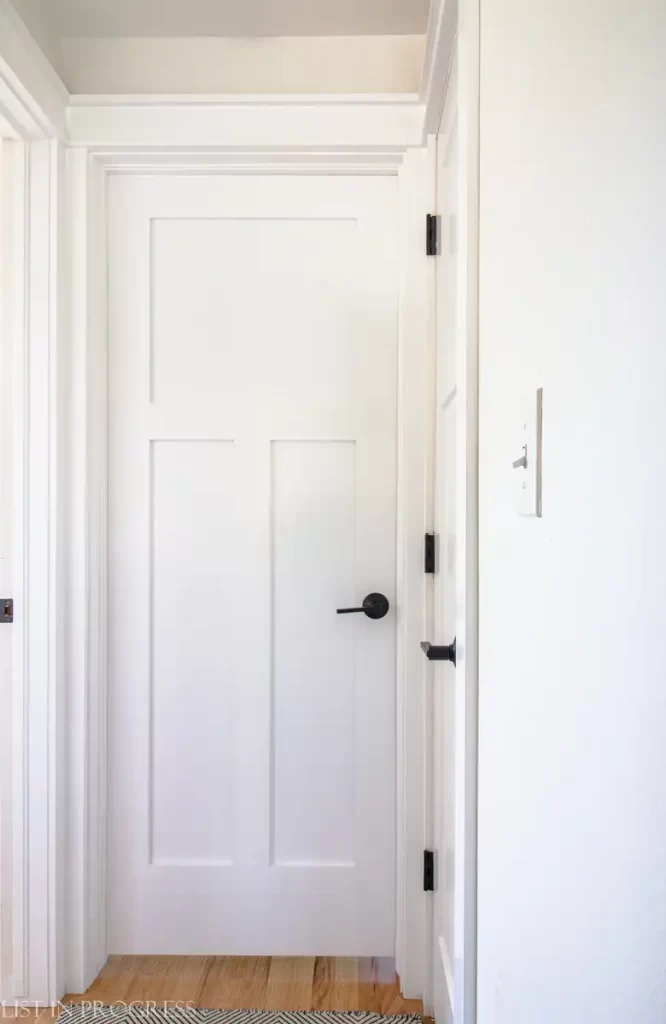
And here is the final product!
I love how this looks with the Craftsman-style doors. We painted the doors in the same trim paint. The door trim is built to match on the inside and outside of each room, so it looks like this on both sides.
Don’t Miss: The Best White Ceiling Paint
Read More: 60+ Modern Black Door Hardware Ideas
How to Adjust Trim for Hinges and Strike Plates
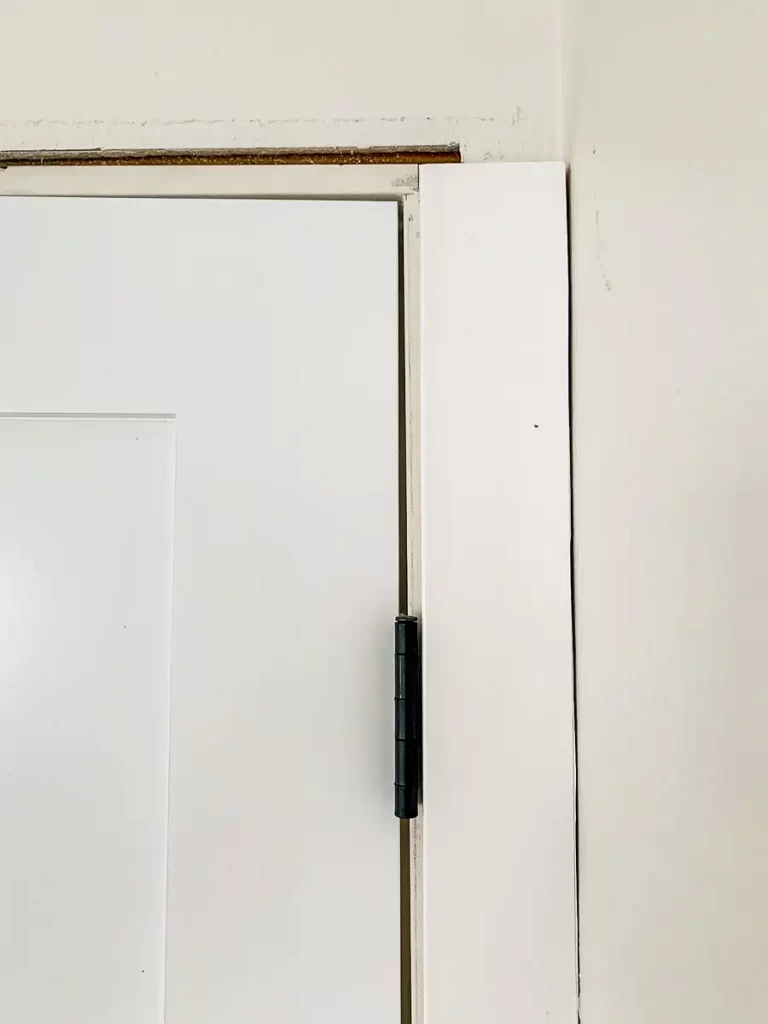
Last week, I got a great question from a reader about accommodating for hinges with this kind of trim. Our old trim tapered in toward the door frame, so there was space for the hinges and strike plate.
With this trim, we’ve just installed the casing as close to the hinges as possible, but you can see that it is slightly offset from the doorframe.
If the trim was flush with the frame, we would have to notch out the casing around the hinges, which would be odd.
Wyatt ripped this piece of door casing in order to fit in the corner, and it will be caulked and painted along both sides (where it meets the door frame and wall).
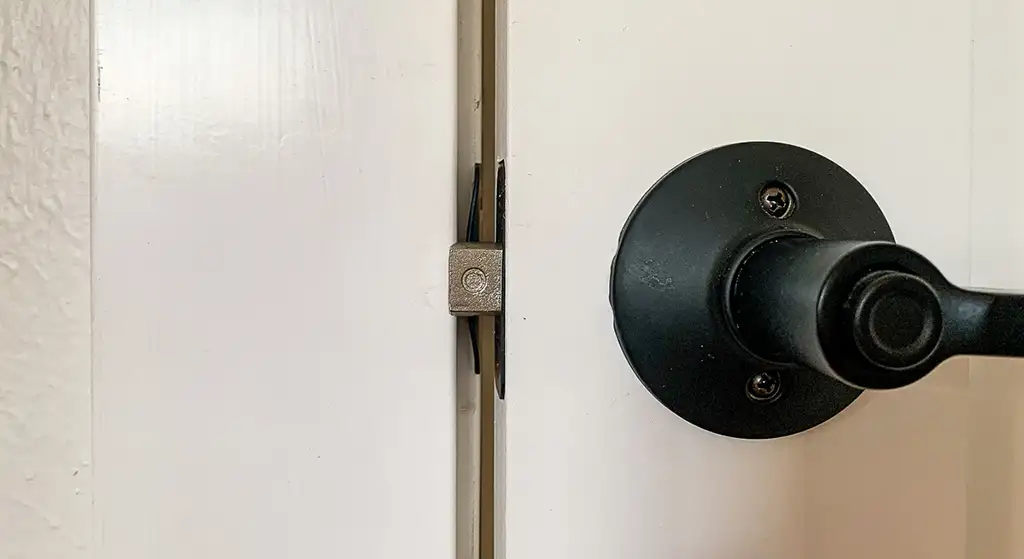
On the other side, this is what the casing looks like where the door latches shut. Even with the casing offset a tiny bit, the latch does scrape the trim very slightly, but not enough to bother us.
However, if you want to avoid this issue, it’s possible to buy extended strike plates instead of the ones that come with your door handle kit.
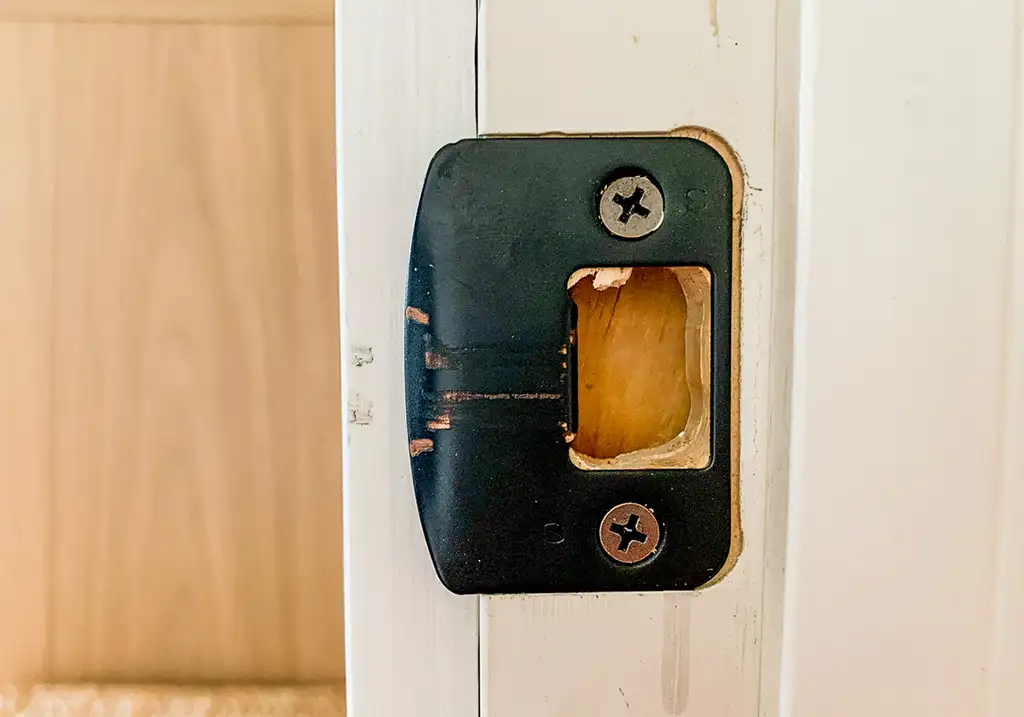
This is what the strike plate looks like. An extended strike plate like this would cover the trim and avoid the paint-scraping issue. Looks like we’ll need to replace those strike plates at some point, anyway!
Read More About Our DIY Home Updates
Favorite Behr White Paint Colors
Closet Door Ideas to Update Any Room
The Best Flooring for Every Room in Your Home
Trends in Cabinet Hardware

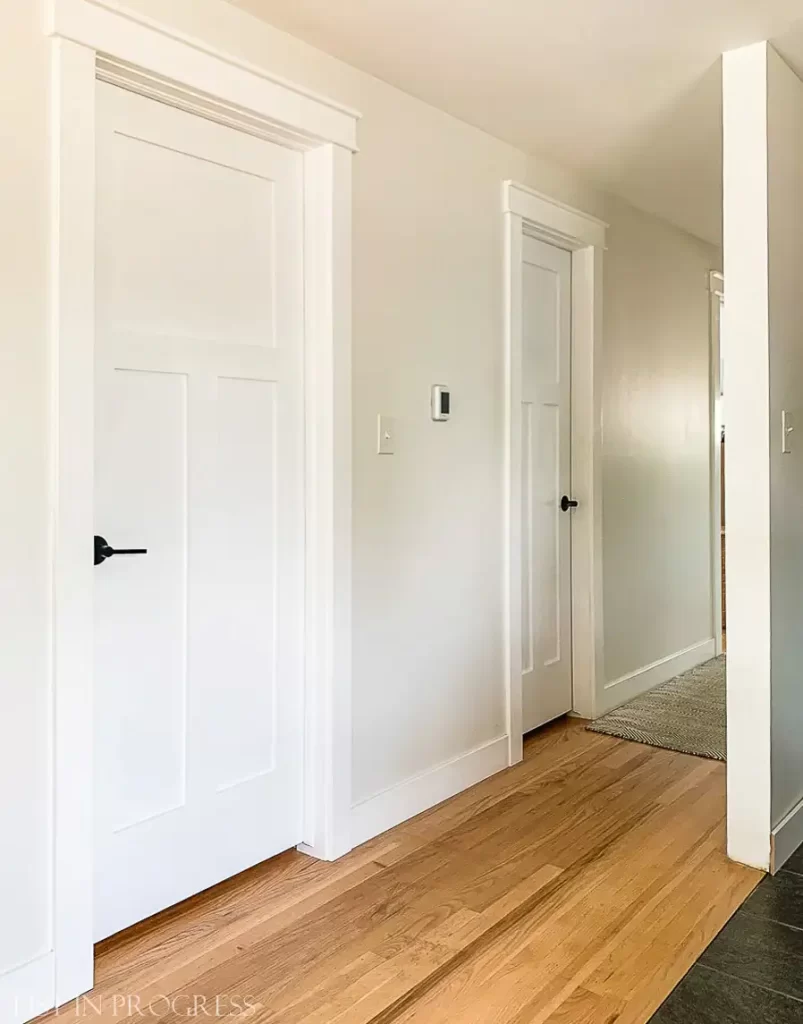
Final Craftsman-Style Door Trim with Painted Doors
This is the end of our hallway with completed trim. I love how the casing runs together where the three doors meet.
Read More: The Best White Ceiling Paint
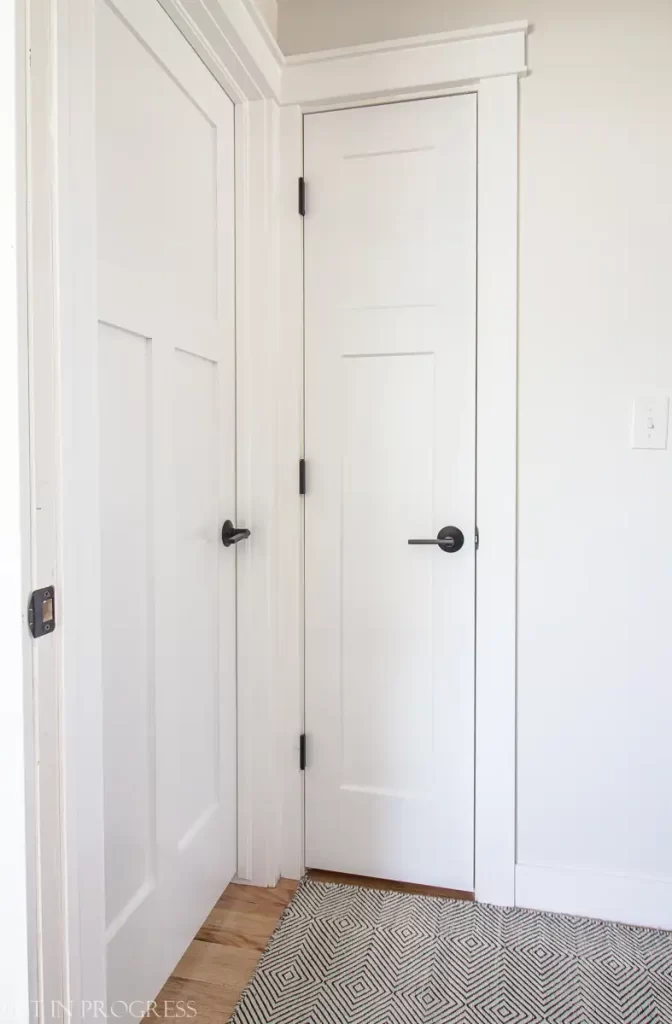
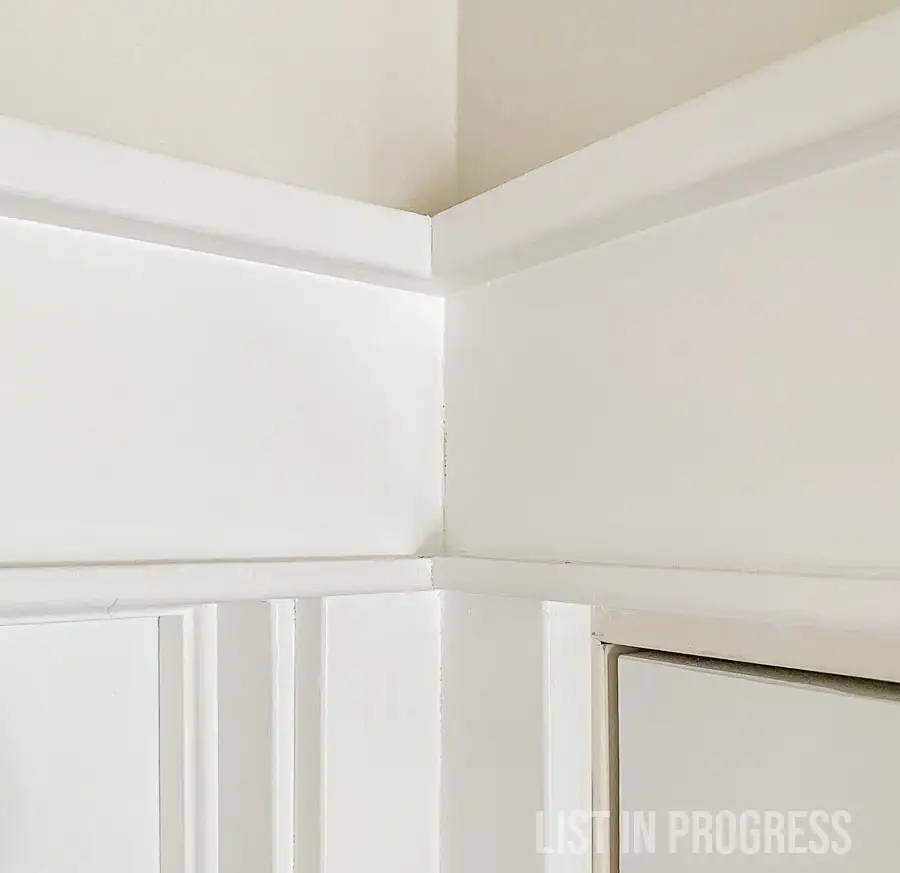
Here’s a close-up of the corner where the pieces meet. For this continuous trim across three doors, Wyatt constructed the trim components in place (rather than building headers outside), due to the various custom angles.
The 1×4 header pieces, running horizontally at the top of the doorframes, meet in a butt joint in each corner.
The skinnier pieces that form the top and bottom of the headers are mitered together.
Any additional questions about how we constructed this Craftsman-style door trim? Please let me know! Drop a comment below.
More About This Project:
Product Sources:
Similar interior doors
Pine 1×4 boards
MDF 1×4 boards
Pine 1×2 boards
MDF 7/16 x 1 1/4 boards
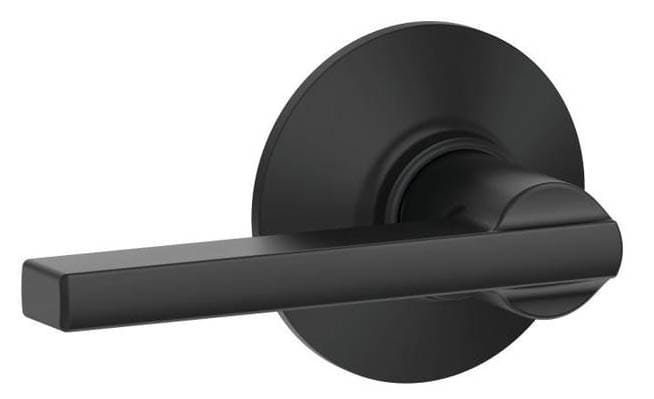
Schlage Latitude door levers
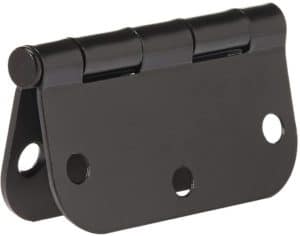
Black hinges
Rug – diamond runner in hallway
Paint Info:
Trim and doors are painted Ultra Pure White semi-gloss by Behr
Walls are Silky White eggshell by Behr
Favorite Behr White Paint Colors
Painting Tools and Tips
12 Tips for Using a HomeRight Paint Sprayer
Here are my coordinating black hardware picks:
12 Modern Black Door Hardware Ideas
6 Modern Black Cabinet Pulls


Hello!
For the header, how much did you overhang it on the sides from the vertical 1×4?
Thank you! 🙂
Hi Mike – The widest pieces on top overhang the door casing by 1 inch on each side. The 1×4 on top is just 1/4″ shorter on each side than the longer pieces. For example, one door measures 31.5″ wide from side to side on the outside of the door casing. The widest header pieces are 33.5″ and the 1×4 sandwiched between them on top is 33″. Let me know if you have more questions. Thanks!
What size baseboards did you do then? The same 4”?
Hi Alyssa – yes, the same 4″ MDF for base.
My question is – did you paint the doors the same as the trim? Ultra White Semi-gloss?
Yes! We painted doors and all trim the same. Thanks for the question, Debi.
Did you trim room windows with same size trim?
Hi Rusty, No we haven’t trimmed out the windows. If this was our forever house, we might think about it. That would look great.
big thanks for inspiring me to update our door and casing . Question about the mdf 1×4….don’t those have a slight round over along the facing edge? Just wondering what your thoughts are on that. It bugs me a bit that they are as sharp as the polar or pine.
Hi Roger, Glad to hear you’re inspired! Yes, the mdf has a slightly rounded edge. It doesn’t bother me, but I can see that it might bother some as it’s not a perfect match with sharp angles on real pine. You know, we ended up using the pine in all of the header pieces above the doors. The casing along the sides of the doors are mdf. Good luck with your project!
Hello. Is there any way you can provide a close up picture of that tight corner? I am in process of changing my hallway as well and ran into an issue where two doors meet in a very tight corner. I either want to do a header similar to yours or use rosettes but neither will fit.
Sure thing! I’ll work on it over the weekend.
What are the measurements of the top pieces as in how far they hang over. The 1×2 and 7/16 hang over at one length and the top 1×4 hangs over at a different length.
Looks like maybe 1 in and 1/2 in but might be smaller can’t really tell.
Hi Mike, Thanks for the email. That’s a good question and I will clarify this info in my post. You are right – the widest pieces on top overhang the door casing by 1 inch on each side. The 1×4 on top is just 1/4″ shorter on each side than the longer pieces. For example, one door measures 31.5″ wide from side to side on the outside of the door casing. The widest header pieces are 33.5″ and the 1×4 sandwiched between them on top is 33″. Let me know if you have more questions. Thanks!
We are in the process of updating our trim and baseboards as well, but we’ve run into an issue making it work with the hinges and the latch plate thing. Because the wood is 1” thick, it seems we need to notch where these will go, but it doesn’t look right. Any suggestions? Thank you!
Hi Jen! I’d love to try to help. Can you email me a photo? erin (at) listinprogress.com
Jen, I figured out what I think your issue with door trim might be. I’m going to post a blog update to share how we worked around this. Basically, we just installed our door casing as close to the hinges as possible, without notching for them. In some cases, Wyatt had to rip (cut) the board to fit between the door and a corner, where the doors are close to a new wall. Some of our latches do strike the door casing when the door closes, but not enough to really cause any damage. You can install an extended strike plate if you want to avoid this. Hope this answer helps!
I came to ask this exact question! I had already purchased the longer strike plates, but was curious how you’d done yours. I am happy to hear your trim isn’t becoming damaged! I love the style you’ve done here and am copying it with the exception as I had to use 3/8 x 1 1/2.
I do have a semi related question- I am using 1x5s for my baseboards. I am wondering what your thoughts are on whether or not the corners should be mitered. I feel like they should not, and should just butt right up to one another in a true squared fashion. But part of me is having reservations as I am afraid it might look cheap and undone.
Any thoughts you might have would be helpful! Thank you! And thank you for this wonderful post!
Hi Kate, Thanks for chiming in! 1×5 will look amazing for base! We did not miter the inside corners, just the outside edges. Once it’s caulked and painted, the whole thing looks pretty seamless anyway. I say, go with your gut!