

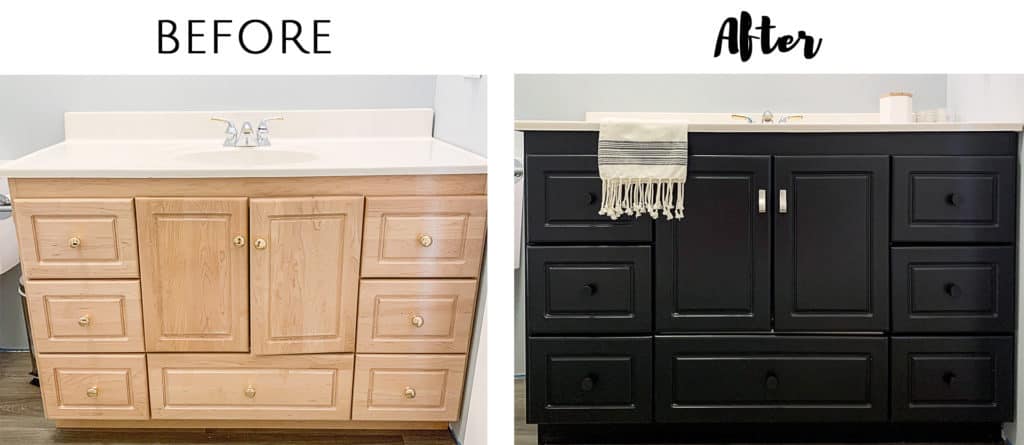
The easiest way to paint cabinets – kitchen, bathroom, any cabinets, really – is with General Finishes Milk Paint. This stuff is magical. I should subtitle this post, “My Love Letter to GF Milk Paint.” Now, I’m not saying this is the fastest method, but if you hate sanding, milk paint is the way to go. Last week, I knocked out a quick and easy bathroom vanity makeover, and I’m breaking down all the steps in this post. Here’s the scoop!
Why Milk Paint is the Easiest Paint for Cabinets
General Finishes Milk Paint is a versatile, high quality, mineral-based paint. I haven’t tried other milk paints or chalk paint, because I’m so impressed with this one, but I believe they should function similarly. Despite the name, GF Milk Paint is not actually made with milk, but it has a similar finish to the original stuff. The best part is that it sticks to almost anything, and doesn’t need primer. Seriously, you can forget heavy duty sanding, too! You should still clean off any old grease and gunk.
Don’t worry, I wrote about that too…
How to Clean + Degrease Old Wood Cabinets
GF Milk Paint is virtually odorless, which is so much more pleasant than an oil-based or other high VOC paint. If you’re not convinced, take a peek at the cult-like following in their Facebook discussion group. I painted my kitchen cabinets with GF Milk Paint two years ago, and I’ve been a fan ever since.
The Best Paint for Kitchen Cabinets
Painting is the fun part, but there’s a lot that needs to happen before you dip a brush. There’s really no shortcut with any paint. However, General Finishes Milk Paint is definitely the EASIEST of the paint options, because most of the steps require very little elbow grease. Truly, none of this is hard! Don’t skip steps and you’ll love the final result.
Here is my process when I use GF Milk Paint:
- remove the doors and drawer fronts
- remove hardware and hinges
- clean the cabinet – get my tips and tricks here!
- *lightly* sand
- wipe down thoroughly
- tape along edges
- paint
- paint again (and again, if needed)
- topcoat x2
- reassemble + add hardware

Read More About Our DIY Home Updates
Favorite Behr White Paint Colors
Closet Door Ideas to Update Any Room
How to Apply Gold Leaf to Glass Decor
Trends in Cabinet Hardware
Getting Started: Easy Paint Stills Requires the Right Prep
First, remove all the doors and drawer fronts from your cabinet. I left the drawer boxes in place and just unscrewed the front panels to detach them. Unless they can’t be removed, if you leave things attached, you’ll spend extra time later on, trying to paint carefully around hinges, etc. Just take the time to remove the doors, and the painting will be easier and look better in the end.
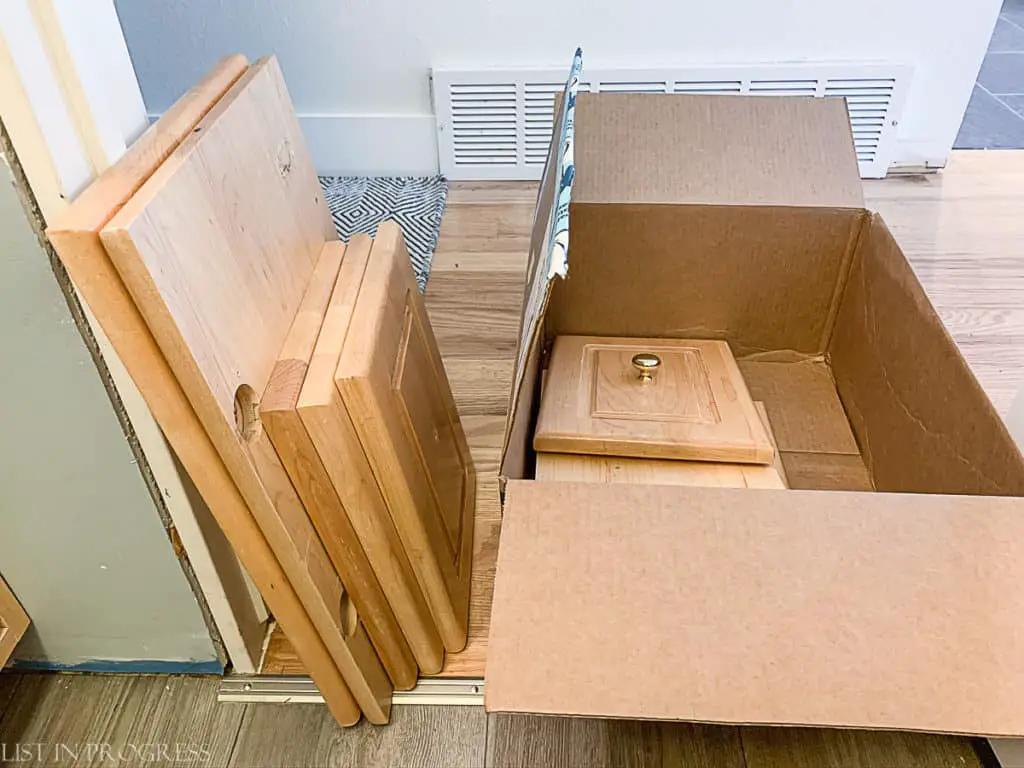
Along the same lines, remove all hardware from doors and drawer fronts. I like to save everything in one box until the very end of the project to stay organized.

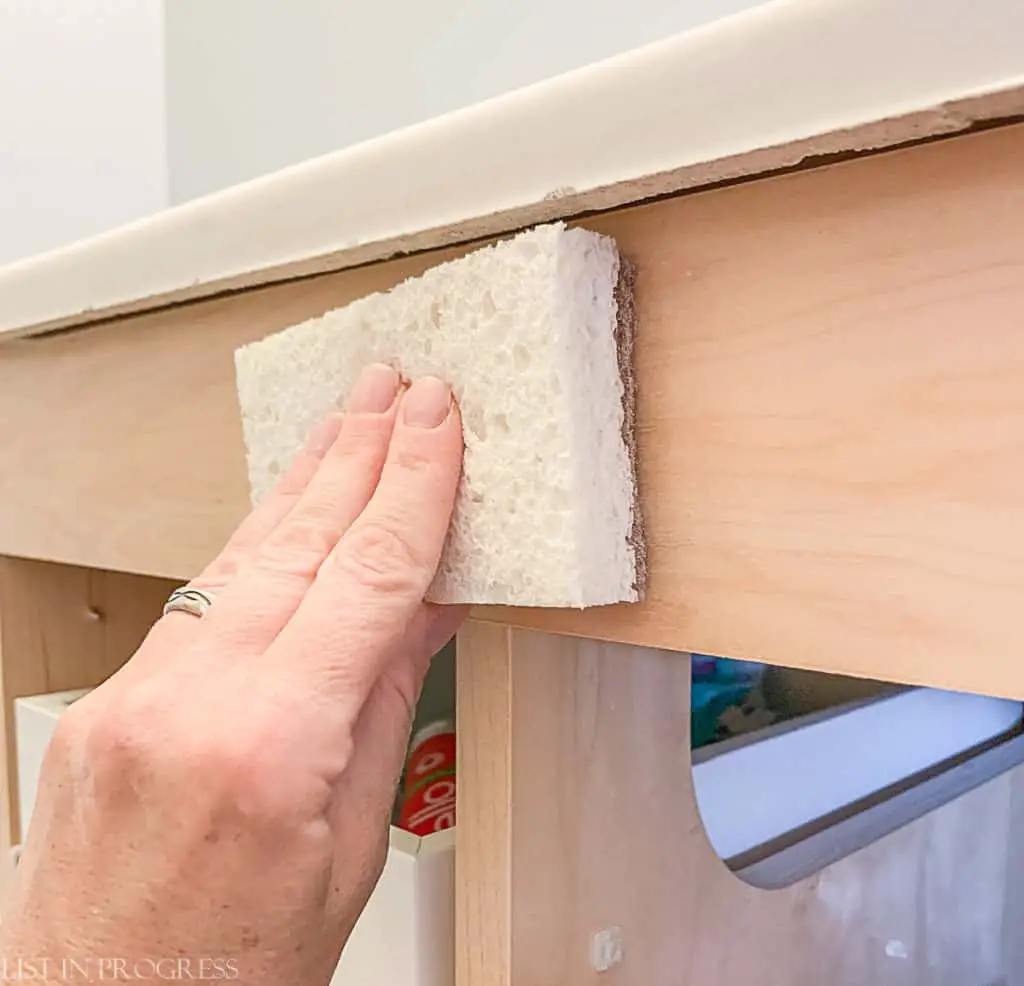
Next, clean the cabinet, doors, and drawer fronts really well with soapy water. If you’re painting a kitchen cabinet and it’s extra grimy, make sure you remove all the crud and grease. These sponges are great if you really need to scrub, along with denatured alcohol (as recommended by General Finishes) or a good dish soap. I used these sponges instead, and I just wiped the vanity down with soapy water.
If your cabinets are grimy, read this post: How to Clean + Degrease Old Wood Cabinets
Sand the Cabinet Lightly
Sanding is the step where milk paint really saves the day. You could sand your heart out, but honestly, I don’t think it’s necessary. I just scuffed this vanity surface with 220-grit sand paper and got the same end result as when I’ve sanded more heavily on other projects (like kitchen cabinets). Just lightly sand to knock the shine off whatever you plan to paint.
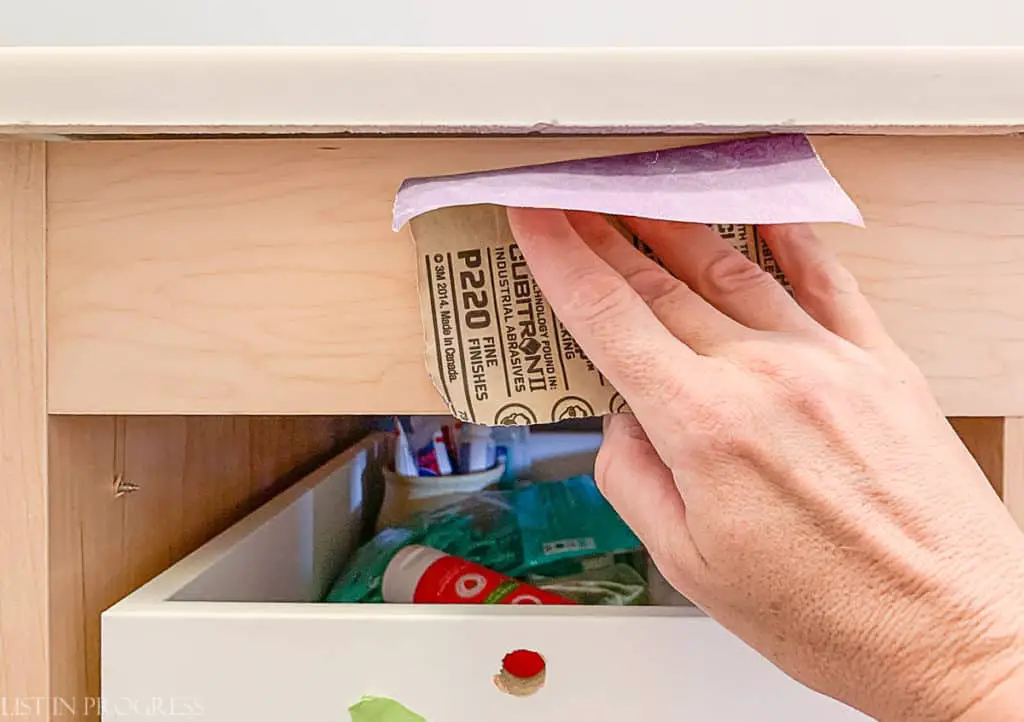
I wrote an entire post on sanding (how exciting and fun, I know!) with tips and product recommendations, which you can read here. Sanding blocks are easier to hold than sandpaper, and they make the job pretty quick and easy. You still might like to have sandpaper on hand for tough spots or crevices. I use these blocks and this sandpaper.
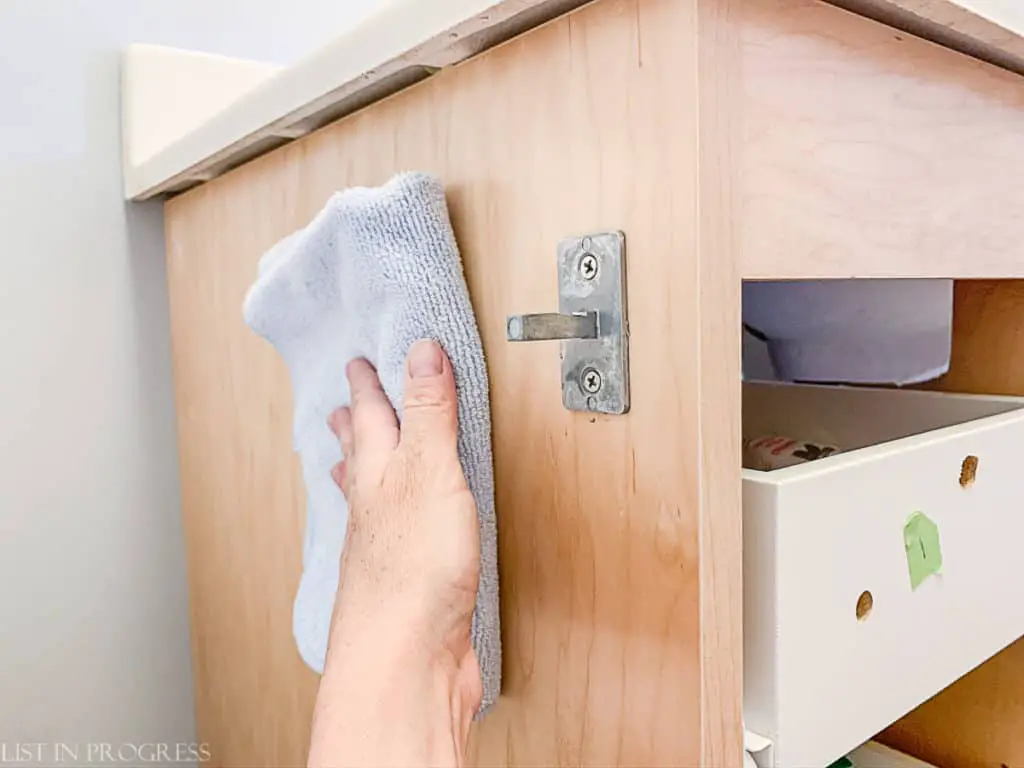
Wipe the surface WELL with tackcloth or microfiber cloths to grab every speck of dust. I love these microfiber cloths because they are reusable, washable, and work really well.
Read more: Sanding Supplies for a Smooth Finish
Read More About Our DIY Home Updates
Favorite Behr White Paint Colors
Closet Door Ideas to Update Any Room
How to Apply Gold Leaf to Glass Decor
Trends in Cabinet Hardware
Tape Along Cabinet Edges
Tape the walls and floor where your cabinet is installed so you’ll have a nice, crisp paint line. I like this green Frog Tape for painting projects because it sticks really well and doesn’t rip the paint off the finish underneath. Frog Tape also sells yellow tape for more delicate surfaces, and I prefer both to the standard blue painter’s tape for a clean line. We do use the blue painter’s tape to protect other areas, but I think the green tape makes a sharper line when you need it.

green tape | yellow tape | blue tape
It’s Time to Paint!
Hooray! It’s time to paint. This is the fun part, and you’ll see why using milk paint is the easiest way to paint cabinets. First, skip the primer. You don’t need it.
Another tip: GF Milk Paint seems to turn out better if you stir it really well, rather than shake the can. Because it’s a mineral-based paint, stirring allows you to scrape the bottom of the can and really mix in the color pigments well.
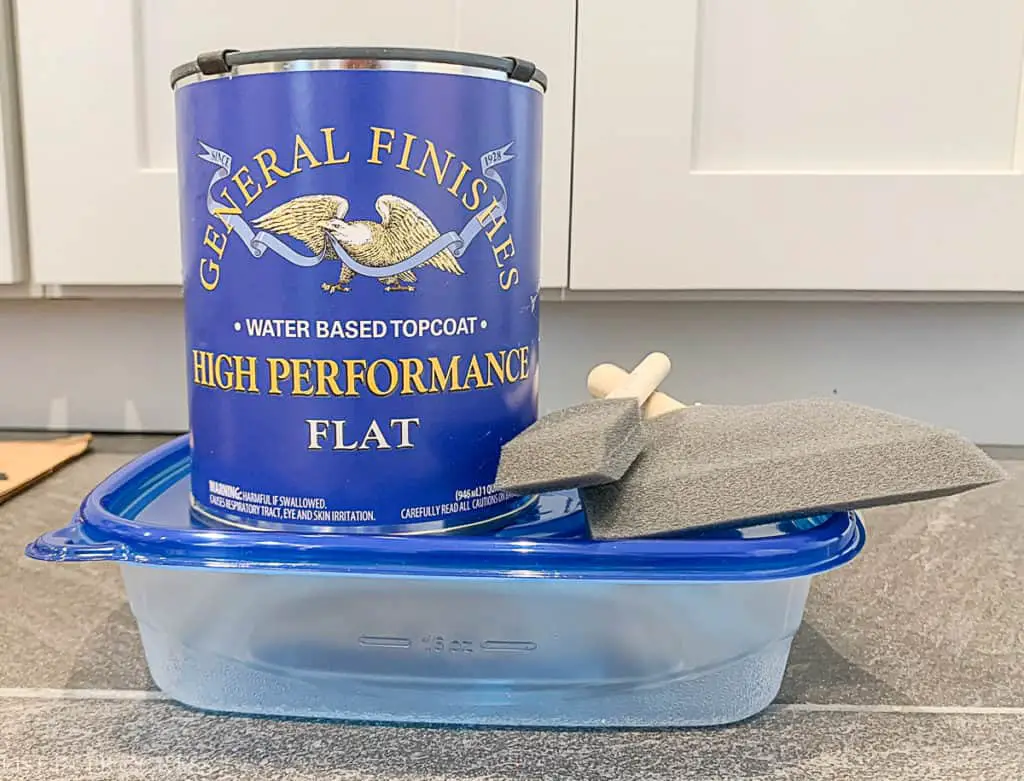
Use plastic storage containers to hold smaller amounts of paint as you work. This trick allows you to pop the lid on the container in between coats, rather than dealing with a paint tray. Make sure to choose a container that is wide enough for dipping your brushes.
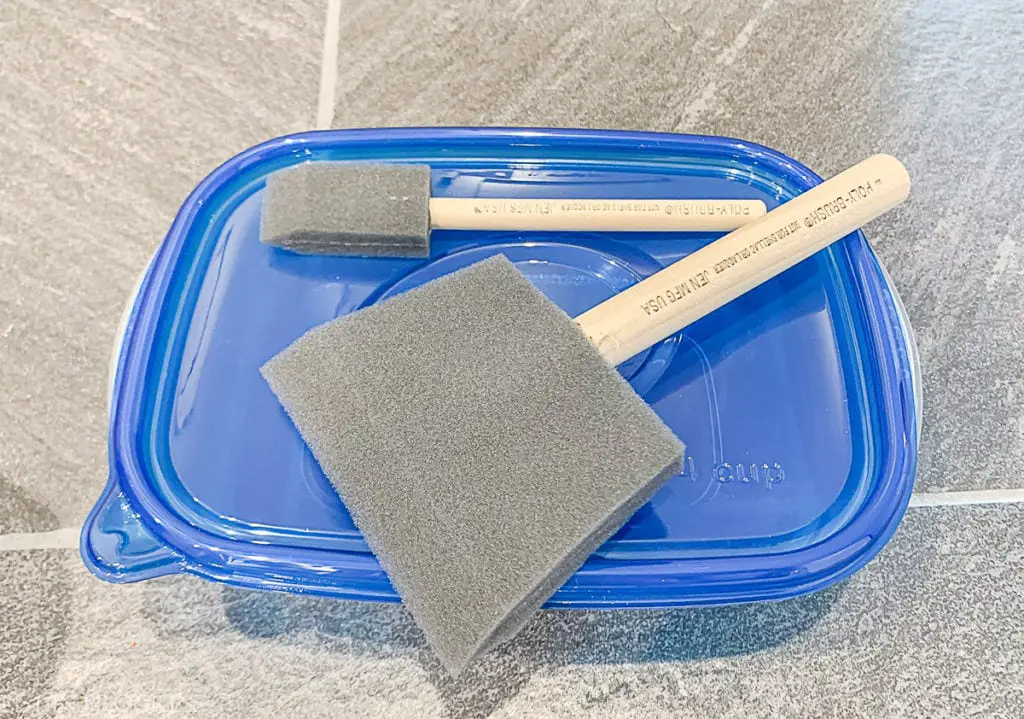
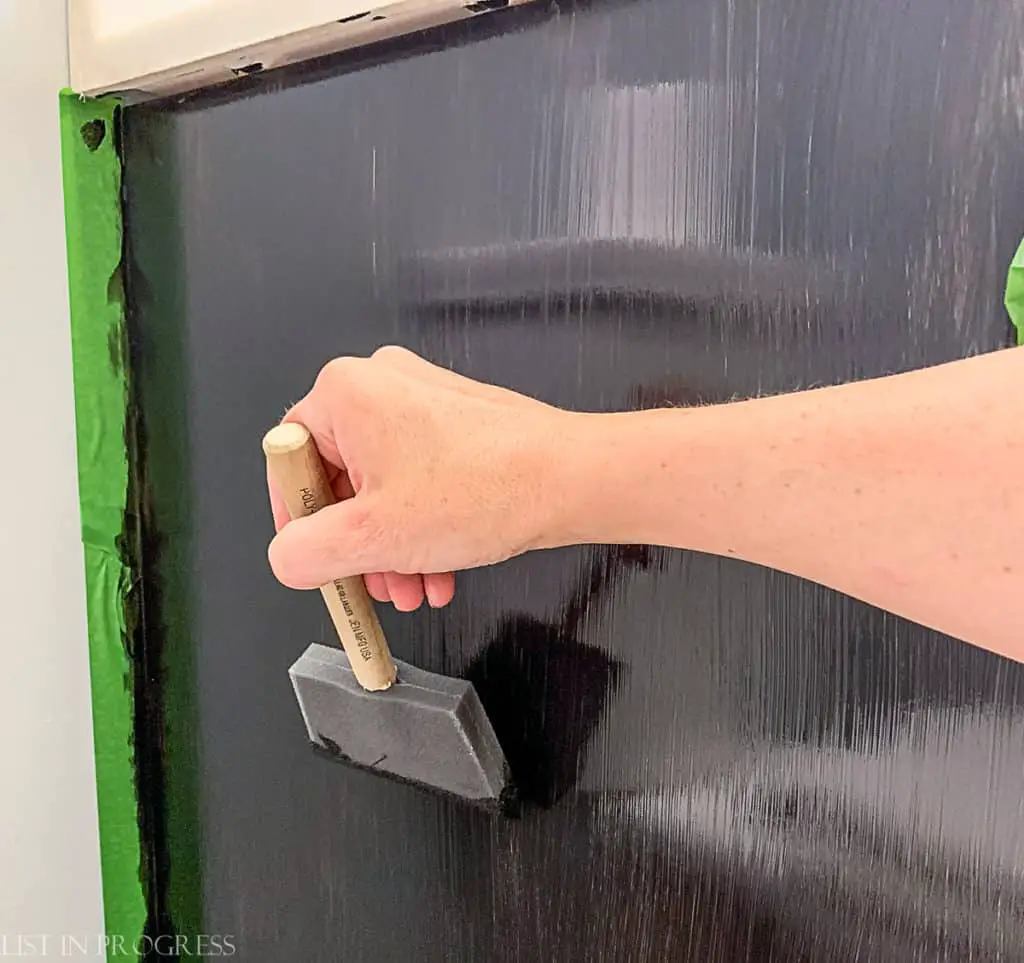
The best brushes for painting cabinets with milk paint are these foam Jen Manufacturing brushes, available in different widths. If you’re painting one cabinet, like this vanity, then just buy one or two of each in the 1″ and 3 – 4″ sizes. It’s nice to have a small size for narrow parts and a wide brush for the panels. If you’re planning to paint a kitchen, buy the 24-pack, or larger quantities.
Also, don’t try to wash and reuse these brushes more than once, because they get a little mushy with use. You could also use a foam roller, but I prefer the finish with brushes. I always have these on hand in a variety of sizes for touch-ups.
Brush options: 1-inch | | 2-inch | 3-inch | 4-inch | multi-size pack
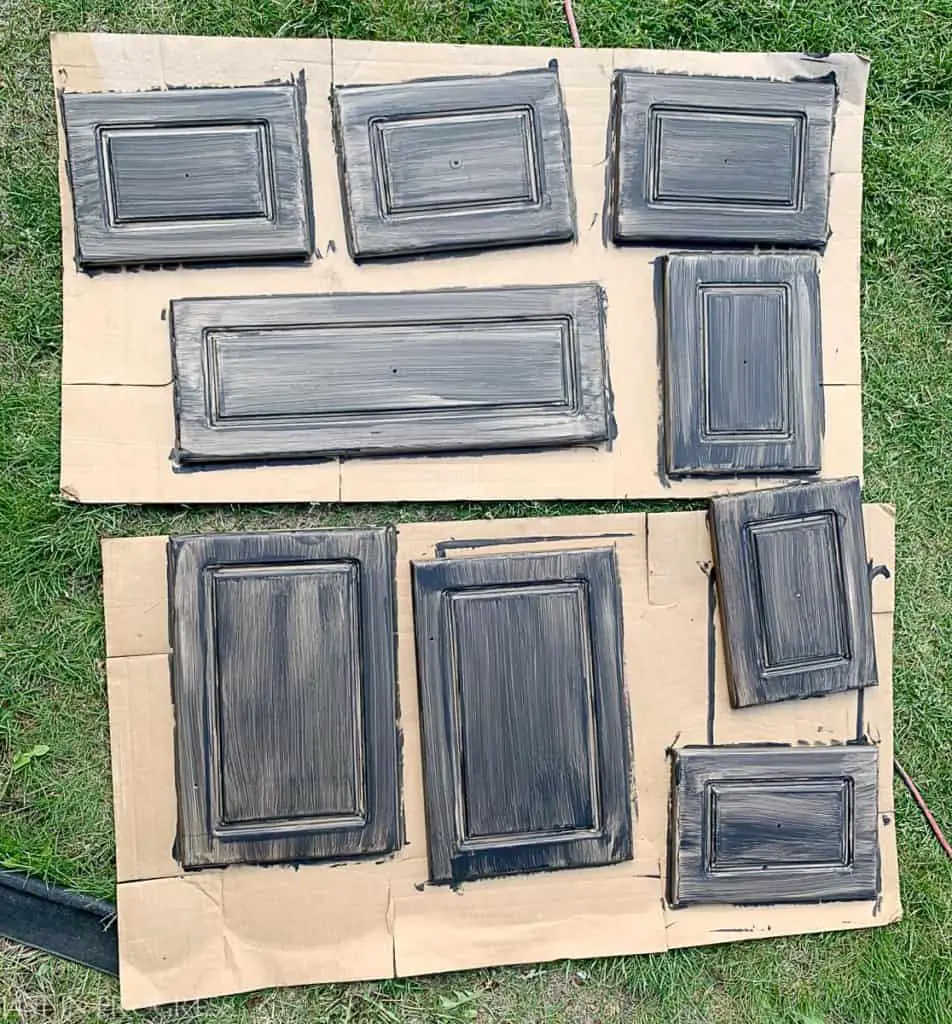
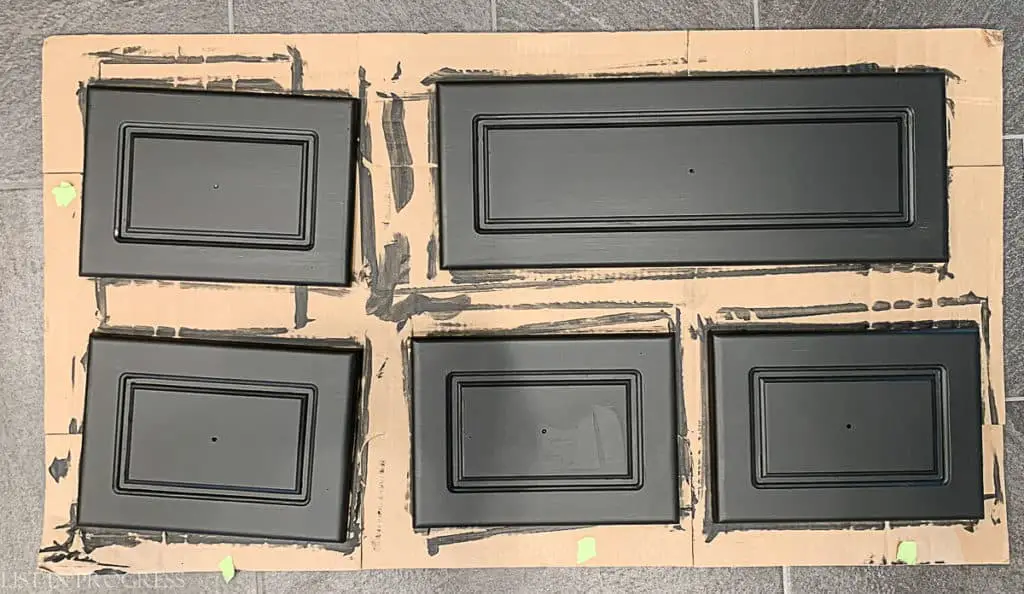
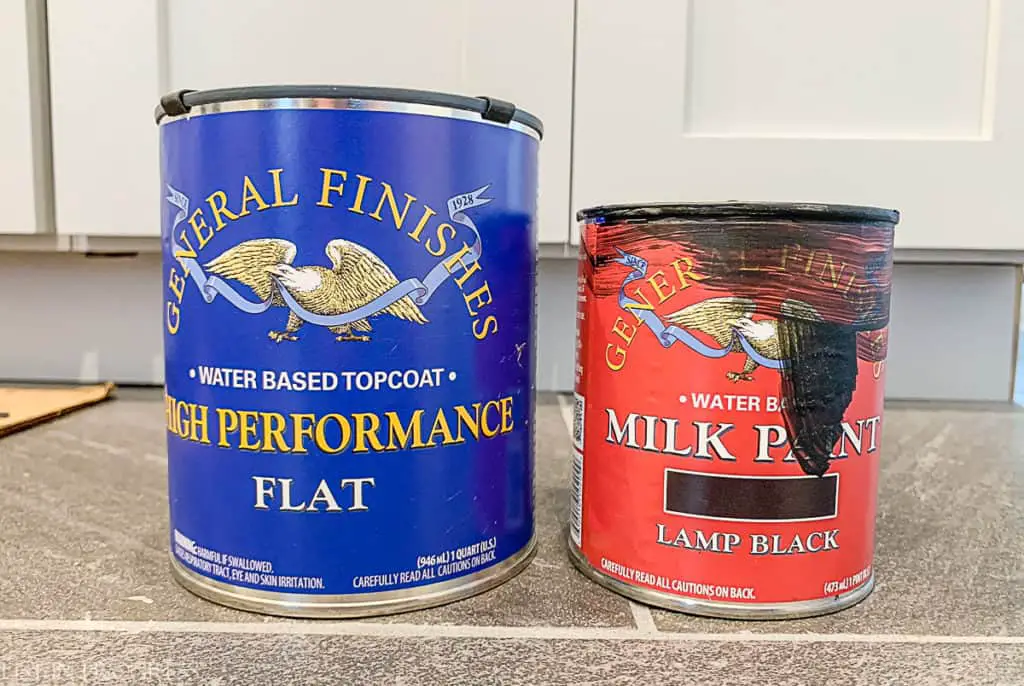
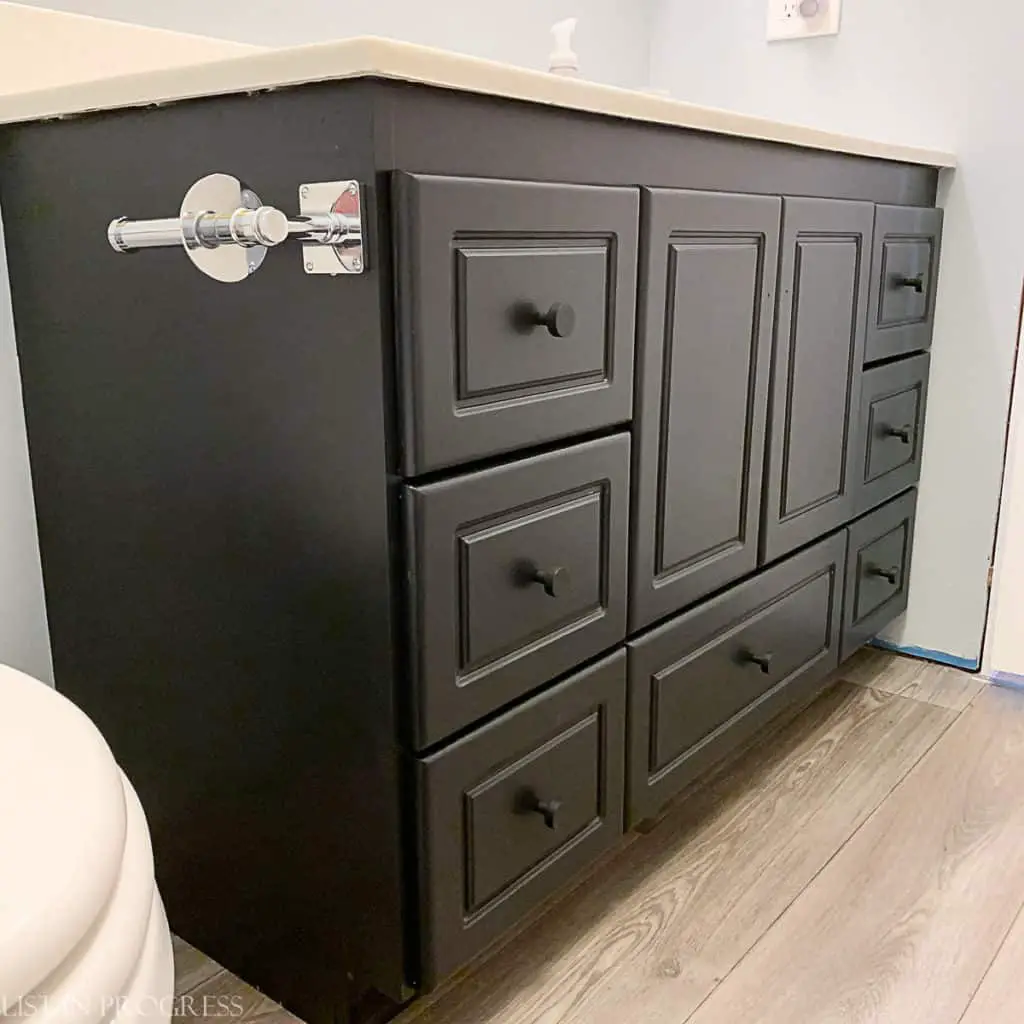
For this project, I painted three coats of GF Milk Paint in Lamp Black on both the cabinet box and doors/drawers. Actually, I used the entire pint that I bought on Amazon, and I had just enough paint.
Read More About Our DIY House Updates
Favorite Behr White Paint Colors
Closet Door Ideas to Update Any Room
How to Apply Gold Leaf to Glass Decor
Trends in Cabinet Hardware
Using a Topcoat with General Finishes Milk Paint
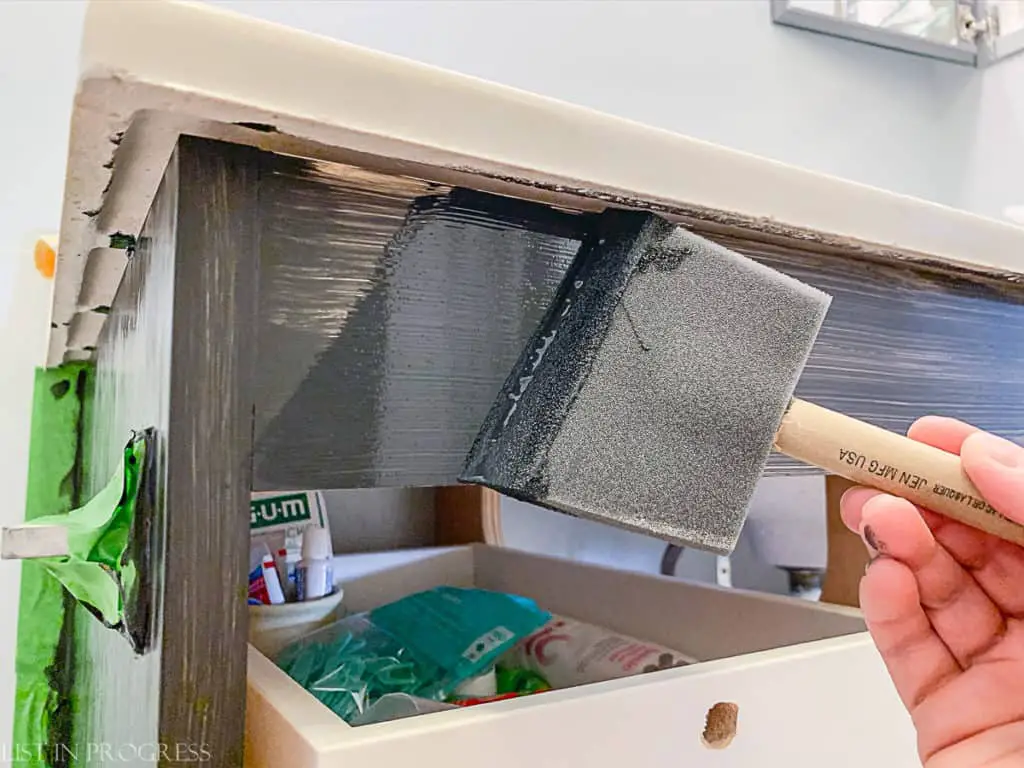
If you’re painting cabinets with this milk paint, don’t skip the topcoat. General Finishes makes a few different topcoat finishes, which is how you’ll get the sheen you want. I used this High Performance Topcoat in Flat, to give the cabinet finish durability and longevity. I’m amazed at how well it holds up to use on both kitchen and bathroom cabinets.
For this project, I painted two coats of flat topcoat product. When I painted kitchen cabinets, I applied three coats of the satin finish.
In my experience, the topcoat sheen tends to be a bit shinier than you might expect, as compared to latex paints. This flat topcoat has a subtle sheen, which is very pretty, but it’s not a completely matte finish. I know the satin topcoat looks more like semi-gloss, so I can imagine how shiny the semi-gloss or gloss finishes must be.
Also, a little goes a long way; a pint would more than cover a cabinet this size. However, I bought a quart of topcoat because I’ll probably use more in the future, and it’s just slightly more expensive for twice as much product.
Topcoat recommendations: HP flat | HP satin | HP semi-gloss

Drying Times Between Coats
For those keeping track, I painted five coats on this project. Three coats of paint and two coats of topcoat. That sounds like a lot, but this paint dries quickly, especially in our dry Colorado climate. As soon as the surface felt dry to the touch, after about 30 minutes, I applied another coat of paint or topcoat. The entire painting project took no more than 3 days, and I was taking my time. You could do this in 2 days if you want to bust it out.
Also, I didn’t sand between coats of paint, unless there was a flaw or drip in the finish. You can certainly do that, but I don’t usually bother. I like to keep painting as easy as possible!
Reassemble Your Cabinet(s)
If you’re reassembling the cabinet back together exactly as it was, this last step should be simple. On this vanity, I replaced a couple of broken hinges on one cabinet door, so it took a little finagling to get the doors adjusted.
If you’re new to cabinet hinges, there are two screws that can be adjusted to help the door move side to side and forward and back, so it can be aligned with the cabinet. I’m no pro at this, so I just played around with adjustments until the door seemed aligned.

Add the jewelry to your project for the finishing touch. I had these matte black knobs left over from our kitchen remodel, so I installed them on all of the drawers. However, I wanted something more interesting for the two cabinet doors in the center. I love researching hardware (#DIYgeek) and I decided to give these silver knobs a try. Last week, I shared all my other great finds for modern cabinet knobs in this post.
Read More: Modern Cabinet Knobs to Jazz Up Your Space
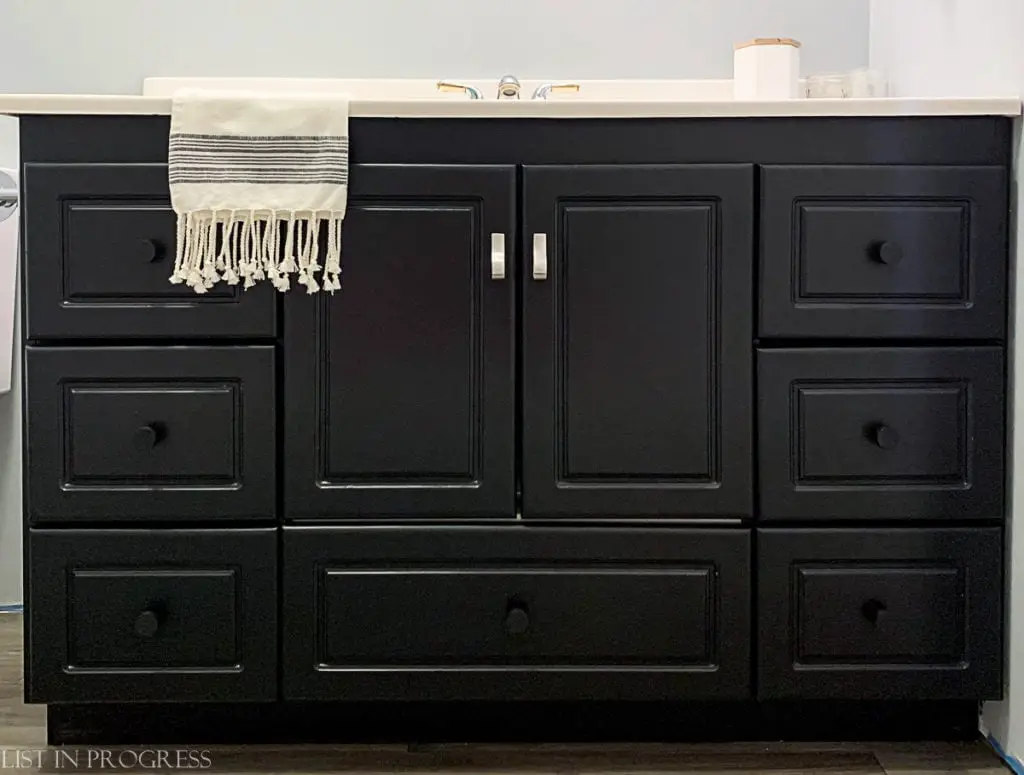
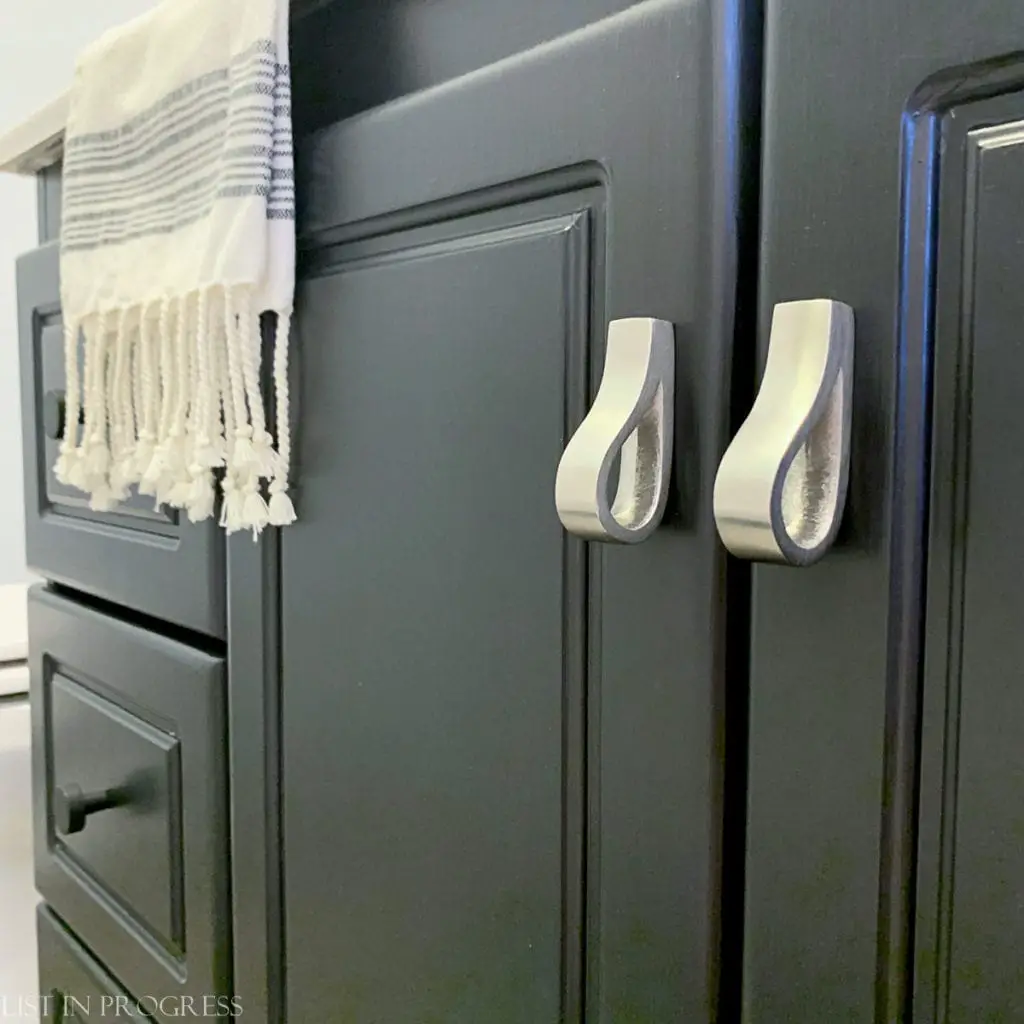
hand towel | silver knobs | black knobs
Ta-da! What do you think? Want to give this paint a shot on your next project? Find out for yourself if this really is the easiest way to paint cabinets.
Read More About Our DIY House Updates
Favorite Behr White Paint Colors
Closet Door Ideas to Update Any Room
How to Apply Gold Leaf to Glass Decor
Trends in Cabinet Hardware
What’s Next for Our Bathroom Update?
Stay tuned for the rest of this bathroom makeover in the next few weeks! I’m planning to change out the vanity light fixture, add a mirror, towel hooks, and some cute textiles and artwork. We’re also thinking of buying a matching piece of quartz for the vanity counter when we order our new kitchen countertops. That means I need to find a sink, too. Aside from the countertop, this should be a pretty affordable update.
Complete Project Source List:
Scotch-Brite sponges (heavy duty scrubbing) OR Walnut scrub sponges (light scrubbing)
220 grit sanding blocks | sandpaper
Microfiber cloths
Green Frog Tape | blue painter’s tape
Foam brushes: 1-inch | | 2-inch | 3-inch | 4-inch | multi-size pack
Plastic food storage containers
GF Milk Paint in Lamp Black (1 pint)
High Performance Topcoat in Flat (1 pint)
Black knobs
Silver knobs
Hand towel
Toilet paper holder
Read More About DIY Projects
1 – How to Create Craftsman-Style Door Trim
2 – Best Exterior BEHR White Paint Colors
3 – The Best Flooring for Every Room in Your Home
4 – 2021 Trends in Cabinet Hardware
Subscribe and never miss a post!
I will only email you 2-3 times per week, MAX. No junk!
[mc4wp_form id=”402″]